I recently entered an event at Bedford Camera Club, where we were presented with six photographs in RAW. Our objective was to process three images and present back how we did it. These are my notes, about how I went about trying to make these photos pop in Lightroom and Photoshop. I have not explained the technical details, but I have included some links to all the technical information..
Amazon have a good deal on Lightroom and Photoshop at the moment:

Image 1. How to make Your Photos Pop
This is the first image in RAW. Looks very drab and ordinary, BEFORE processing.
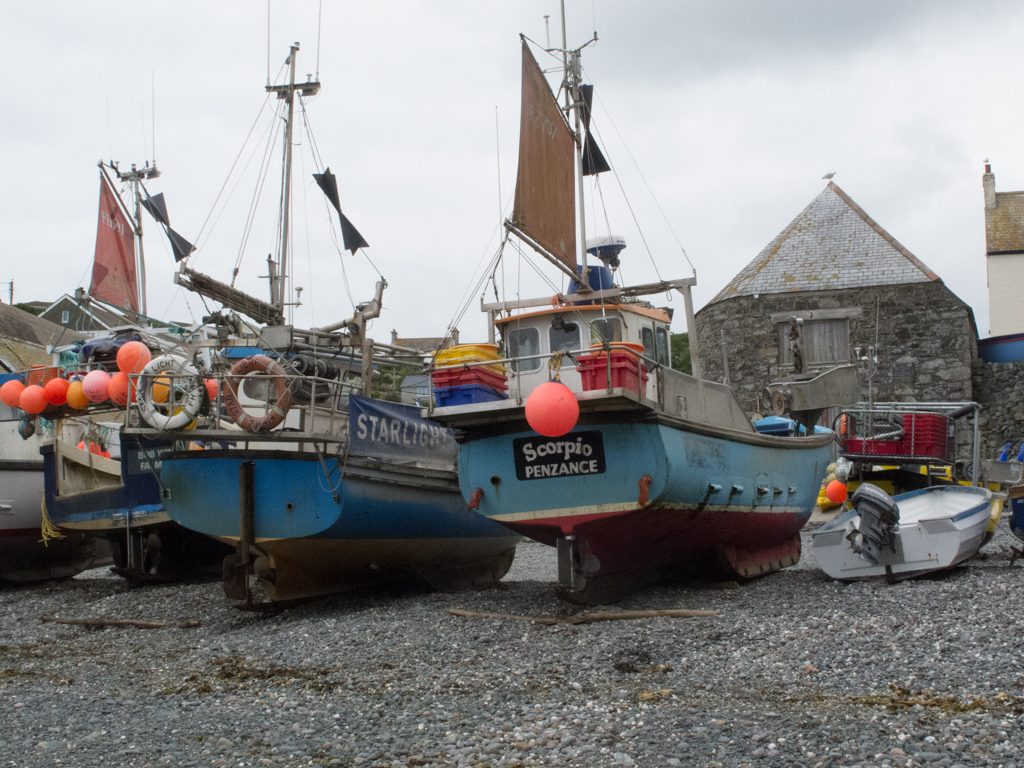
Image 1 BEFORE
The Issues with this Image
The picture is grey and washed out. There is no detail in the sky. There is no real focus on what the subject is. There is too much foreground. The edges are messy. The detail in the pebbles and brickwork are lost.
Processing in Lightroom and Photoshop
- Import the RAW file to Lightroom CC.
- Crop to A4 (Custom size 2.1 x 2.97) tightening the view to concentrate on the fishing boats. Excluding the motor boat on the right.
- Straighten the horizon. The roof in the background is not flat
- Check exposure. This image looks around a third of a stop under exposed
- Add contrast to make the image less flat
- Launch a Develop Lightroom preset. Here we are using my user preset for landscape
- Highlights -100 Shadows +100
- Adjust the whites and blacks by holding down the alt key (Windows)
- Move the Clarity / Vibrance / Saturation sliders to suit the effect required.
- Tone Curve. Again to suit effect. Try an S curve
- Sharpening and Luminance around 30-45
- Tick Lens Correction and Enable Profile Correction
- Check the white balance. Take the dropper and pick a neutral grey colour. This will set the white balance.
- Move the image to Photoshop. Photo>Edit in>Edit in Photoshop CC
- Clone out the distracting speed boat on the right.
- Use the Dodge Tool to lighten the foreground and under the boats
- Use the Burn Tool just to add some detail back into the buildings and the decks of the boat
- To replace the sky. Erase the existing sky. Select>Colour Range>Fuzziness c’139. NB this method avoids having to somehow cut around the masts and rigging
- Use Erase tool to take out any remaining sky.
- Select an image with sky and add as a layer. Blend with the existing layer
- In Photoshop save. Image then available in Lightroom
- In Lightroom recheck the white balance / exposure /contrast etc for the new merged image
- Add a Post Crop Vignette that is there but not visible e.g. -14
- Save the image as a JPG
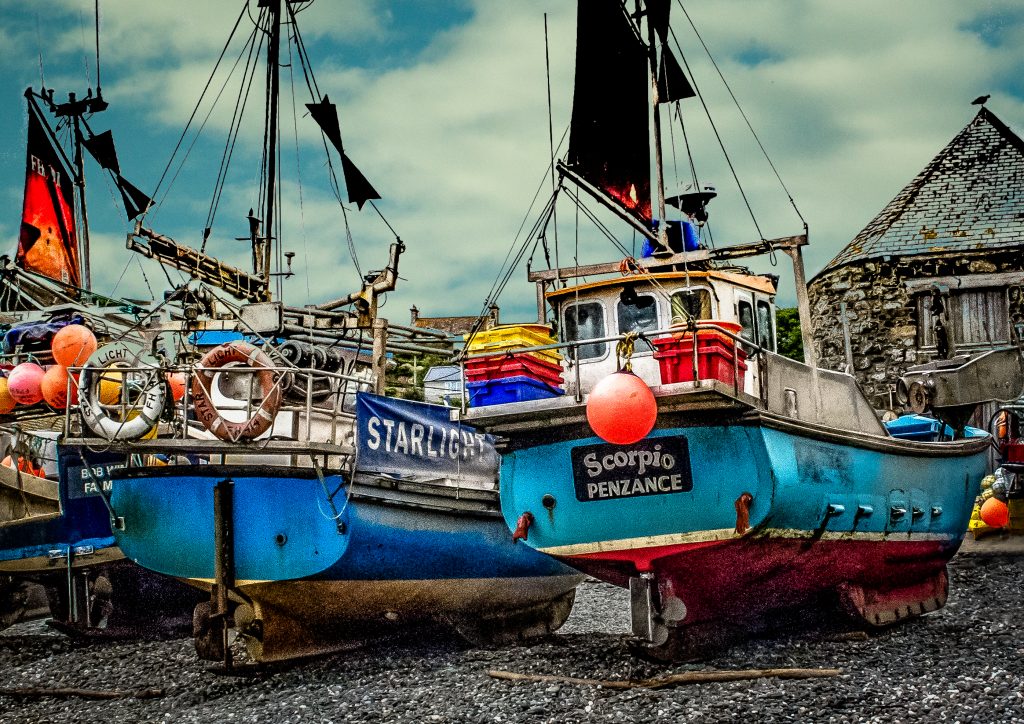
Image 1 AFTER
Image 2 How to make Your Photos Pop
This is the second image in RAW. At least there is some interest in this image, but despite the magnificent architecture, it is drab and unexciting.
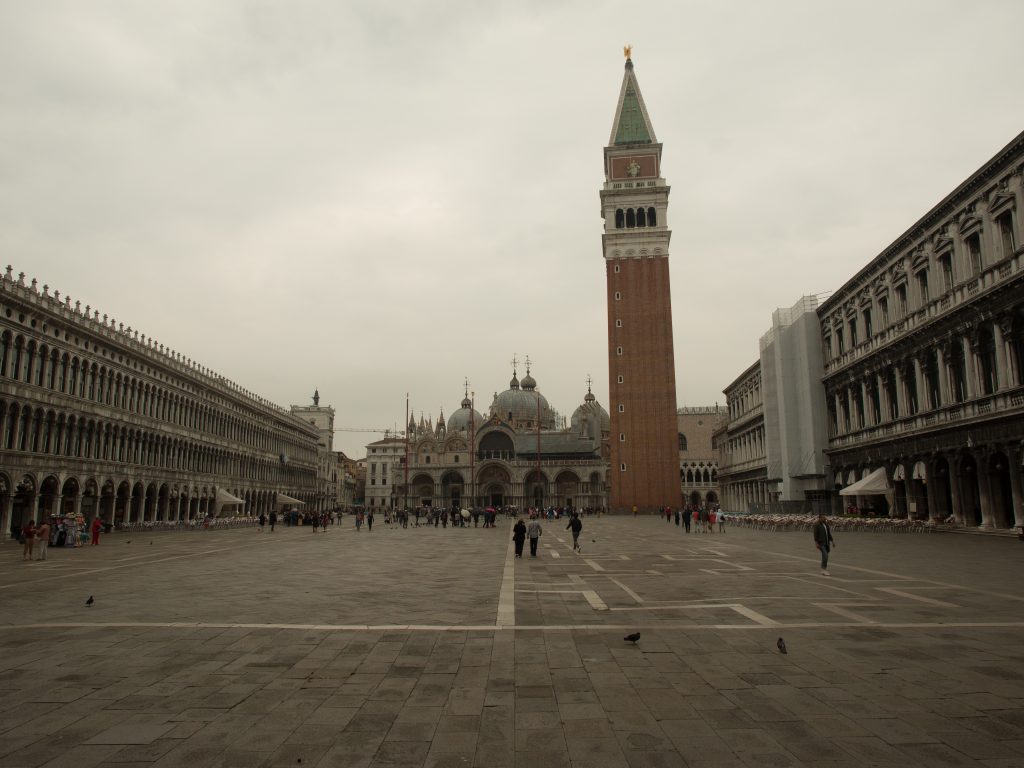
Image 2 BEFORE
The Issues with this Image
This image has an odd sepia cast, as if the white balance needs correction. The detail in the sky is probably not worth trying to recover and could be replaced. The picture is dark and lacks detail. There is no real focus on the subject, the photograph is not about the two pigeons in the foreground.
Processing in Lightroom and Photoshop
- Import the RAW file into Lightroom CC
- Crop to A4 and lose the foreground
- Check exposure. This image looks around a third of a stop under exposed
- Add contrast to
- Launch a Lightroom preset (see above)
- Clarity / Vibrance / Saturation important to get some colour from the bland landscape.
- Manipulate the tone curve to get some detail
- The tower looks as though it is leaning backwards
- Go to the Transform tool
- Use the vertical slider to -20 to correct
- Move the image to Photoshop. Photo>Edit in>Edit in Photoshop CC
- Use dodge and burn tools to create different light in the piazza, and to the buildings left and right
- Erase the sky. Select>Colour Range>Fuzziness (see above). This will preserve the building tracery on the buildings to the left and the spires and crosses
- Select an image with sky and add as a layer. Blend with the existing layer
- In Photoshop save. The image is then available in Lightroom
- In Lightroom recheck the white balance / exposure /contrast etc for the new merged image
- Add a Post Crop Vignette that is there but not visible
- The image still has an orange cast so recheck the white balance. The foreground piazza looks as though it should be grey so use the dropper to sample colour there.
- Save the image as a JPG
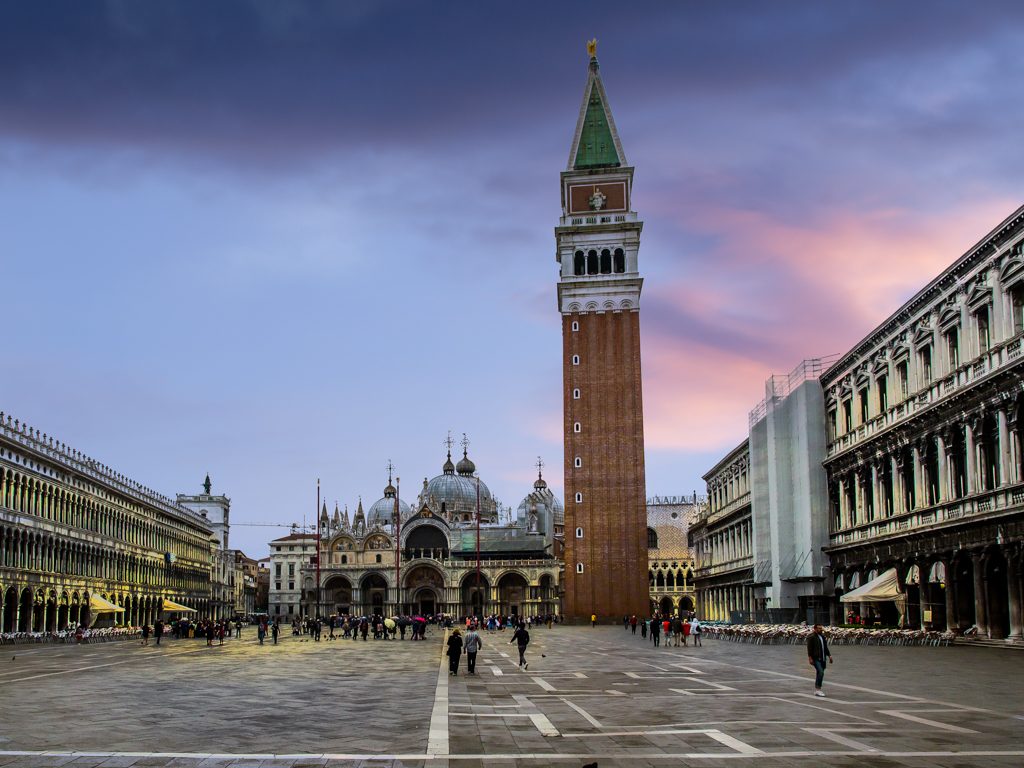
Image 2 AFTER
Image 3 How to Make Your Photos Pop
This is the third image in RAW. There is a picture in there somewhere trying to get out.
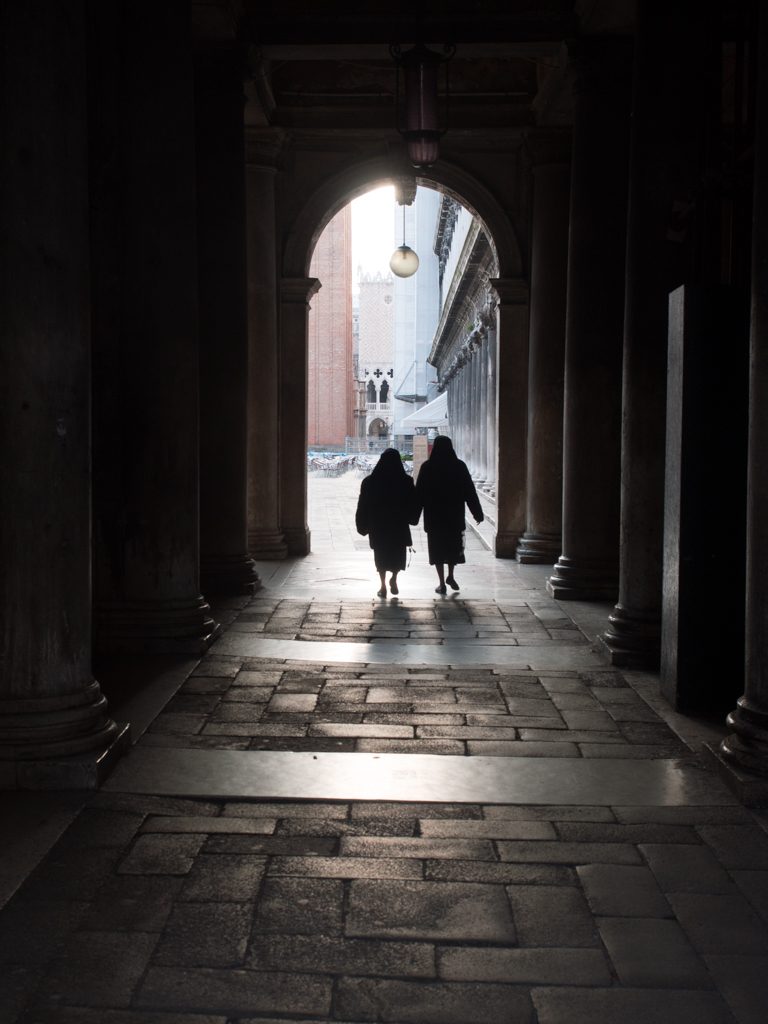
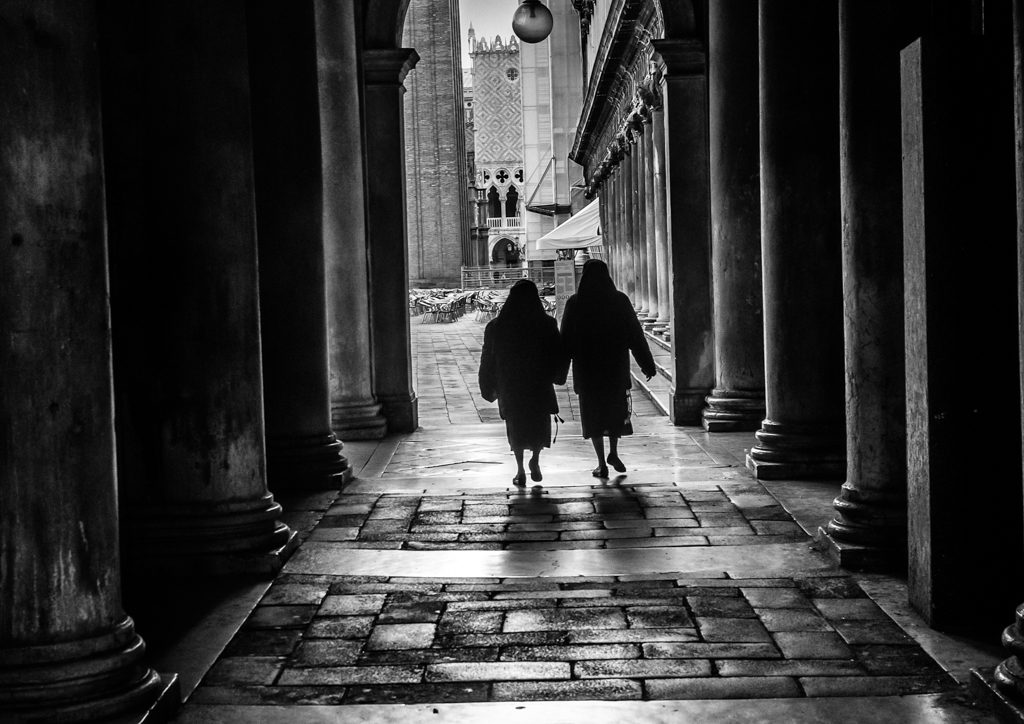
Image 3 BEFORE
The Issues with this Image
The detail in the columns is lost. There is no real colour so would it be better in black and white? The portrait mode makes the picture mostly pavement. The two nuns should be made the focus of the image.
Processing in Lightroom, Photoshop and Nik Silver Efex Pro2
- Import the RAW file into Lightroom CC
- Crop to A4 and change from portrait to landscape. That way we focus on the ladies walking and lose the black shadow overhead. Place ladies in the centre of the rule of thirds grid
- Check white balance/exposure/contrast
- Apply a Lightroom preset (see above)
- Move the image to Photoshop. Photo>Edit in>Edit in Photoshop CC
- Use dodge tool to reveal the detail in the columns and paving.
- In Photoshop save. The image is then available in Lightroom
- Move the image to Nik Silver Efex Pro2 which you can download for free here. Photo>Edit in>Edit in Siver Efex Pro2
- Select a preset from the preset library in Silver Efex.
- Save to move image back to Lightroom
- Add a Post Crop Vignette that is there but not visible
- Save the image as a JPEG
I am fascinated by digital post production. However, I am still very much in the foothills in the journey to master Photoshop especially. If you want to see just what can be achieved, look at the books and videos of Glyn Dewis.