• Home
  • My Notes & Blog
  • Themes
    • Street Photography
  • Images of the Month
  • Galleries
    • Life in Lockdown
    • ARPS
    • Flowers
  • About
  • Contact
    • Privacy Policy

iJourneys

John Gough Photography

Hyper Collage Photography

by John Gough

Ysabel Le May Hyper Collage Photography

Hyper collage photography has developed out of collage, which has long been a technique used in both art and photography. Man Ray was an early exponent of photography collage in the 1930s. Jump forward, and we are all aware of the images created using Photoshop layers to build composites. Often to create fantasy effects. Andrea Hargreaves is one of my favourite artists using this technique.

….but what is collage? The Museum of Modern Art defines a collage as: a “technique and resulting work of art in which fragments of paper and other materials are arranged and glued to a supporting surface”.

Hyper collage photography is a technique that combines multiple images that are manipulated using Photoshop. For example, Jim Kazanjian uses the technique to combine photographs of different architectural features to create fantastical buildings and landscapes.

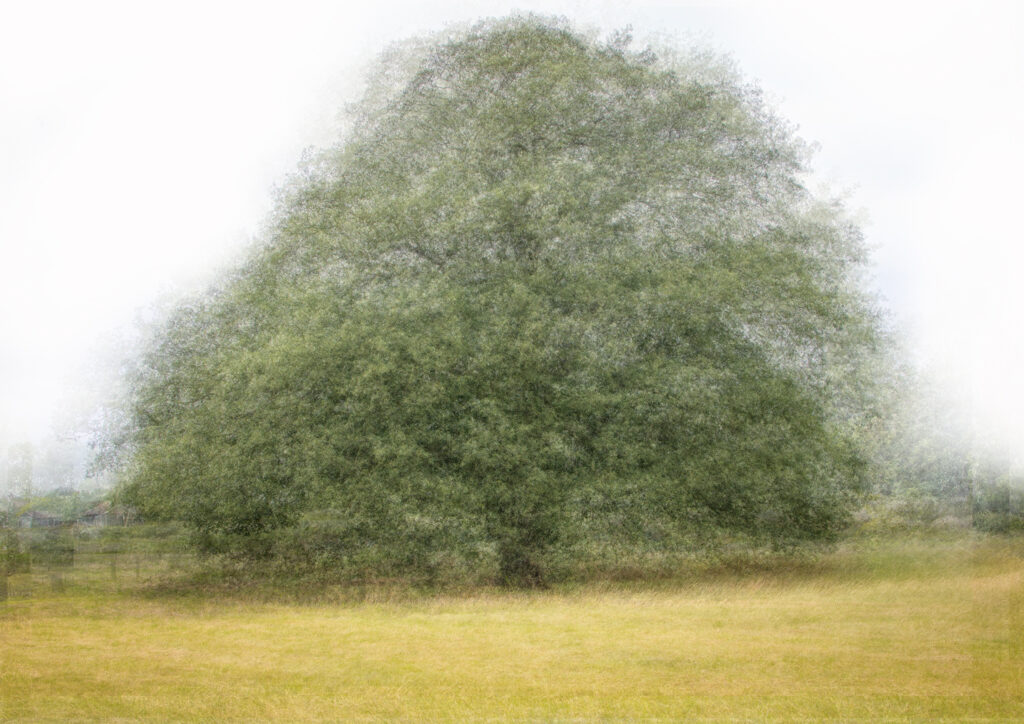
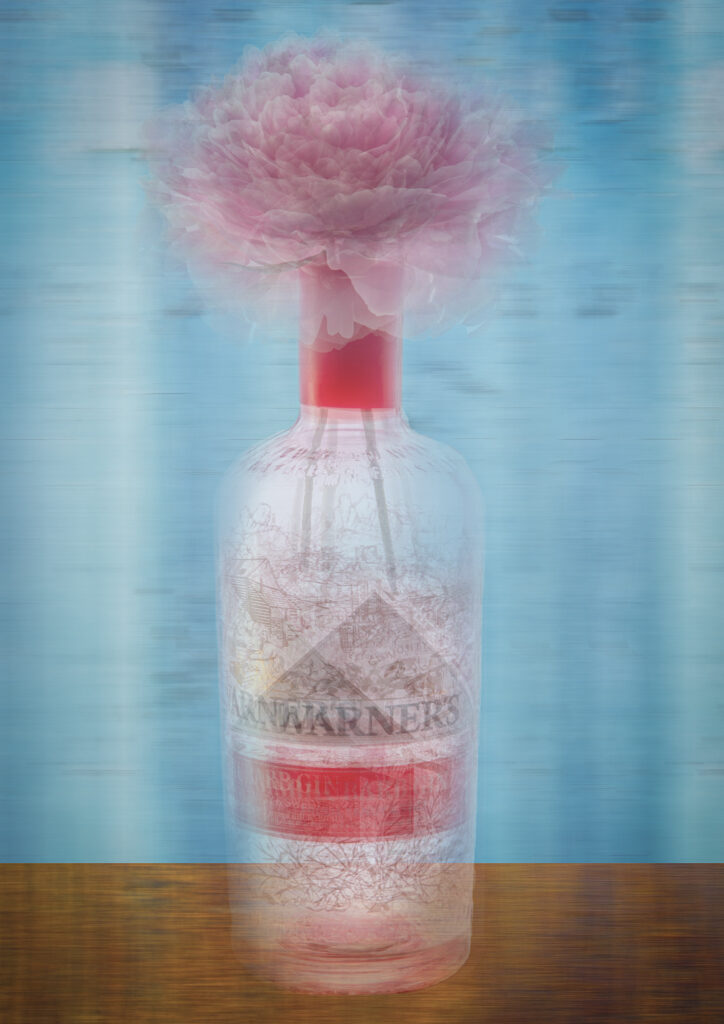
However, what has grabbed my attention. Are photographers that are using natural phenomena to create fine art hyper collage images.

Fine Art Hyper Collage Photography

Ysabel Le May

I first came across Ysabel le May at the Saatchi Art. Where her work sells for upwards of $4000.

She is based in Texas and her art has been exhibited all over the world.

Ysabel Le May can be summed up simply: W.O.W. It stands for ‘Wonderful Other Worlds’, which she creates through the process of hypercollage. 

Saatchi Art

She photographs the natural world and uses collage to piece the images together to create a fantastical depiction of nature. She calls her images baroque tableaux.

The video above demonstrates the process she uses.

Lisa Frank

Lisa Frank is an American artist who describes her work as looking to communicate those momentary flashes of connectedness with nature.

She creates tapestries and still life composites using natural materials.

It is my purpose to draw the viewer into a local world as it hasn’t been seen before.

Lisa Frank

You can follow her process here.

Cas Slagboon

Cas Slagboom is a Dutch artist. Again he uses natural objects but often combined with human figures to create a fantasy feel.

For me, photography is more than capturing the perfect moment. Every time I try to capture my astonishment with a single photo, I am disappointed. This was not what I want to see and feel. It is larger, more complex, more diffuse. I have to bring all those fragments together. In compositions in which they together tell a story that transcends my understanding. So, that every time I look at it, I can be surprised again.

Cas Slagboon

All the photographic technology we have to capture our world in images may give us idea that we really see it. ………I use modern technology to find a language that exceeds the photographic moment, so there is sufficient room for the complexity of what we call reality.

Cas Slagboon

Summary

I included the two quotes from Cas Slagboon because they sum up my own feelings. That it is difficult to capture the reality of the moment with just one photograph. I have been experimenting with the Pep Ventosa style of photography and mixing abstract and reality to capture what we really see and feel.

Hyper collage photography is just one more technique on that journey.

Filed Under: Creativity, Flowers, Journey, Photographer, Photography, Photoshop, Visual Art Photography Tagged With: hypercollage, Painterly, Visual Art

Pep Ventosa Technique

by John Gough

Pep Ventosa Technique
Tree in Midsummer / John Gough / Canon EOS R

Pep Ventosa is a Catalan photographer who is known for his technique of creating impressionistic looking photography by taking multiple images of a subject and blending them together.

His series ‘In the Round’ featured trees which have become the lynchpin of his work. His photography, however, is now more diverse and includes urban landscapes, streetcars and street lamps.

When talking about his work he describes how:

The process mimics how we actually see: the eyes are constantly focusing on the specific details and elements of what’s in front of them and the brain then processes that visual information making the reconstruction so we perceive the world around us.

I have curated a selection of his images here.

The Pep Ventosa Technique

Pep Ventosa uses hundreds of images to create an artwork. Is it art or is it photography? He purposefully blurs the boundaries. Look at his series ‘New Faces from the Past’

Trying to replicate the technique is not easy. As my attempt above illustrates. It is not just a process of walking around a tree, taking photographs and putting them into layers in Photoshop.

A good place to start is with the glorious Glenys Garnett

Tips to Creating a Masterpiece

  • The subject has to be interesting enough to be deconstructed
  • Maintain a reference point on the subject for all the images. For example, I used the tree trunk in the image above. A 3×3 grid in the camera viewfinder is useful.
  • A wide angle lens is best to allow you to get closer to the subject.
  • I took twenty images in the image above.
  • Take jpgs rather than RAW to make it easier to manipulate later. Or do as I did convert them to jpg in Lightroom. Create a similar look and feel for each image and then export to Photoshop.
  • To transfer from Lightroom to Photoshop in one step. Select the images to be transferred in Lightroom: Photo>Edit In>Open as Layers in Photoshop.
  • In the layer stack in Photoshop I used a Normal blending mode with an opacity of 20%. The blending modes and opacity, however, depend on the effect that YOU want to produce.
  • Try keeping the camera fixed and moving the subject see below.
Pep Ventosa Technique
A Peony in a Gin Bottle / John Gough / Canon EOS 6D

Your Own Style

What is exciting about using the Pep Ventosa technique is that so much is down to trial and error, which means that your images will develop into your own style.

Filed Under: Creativity, Journey, Photography, Photography Techniques, Photoshop, Visual Art Photography Tagged With: Pep Ventosa, Techniques, Visual Art

Free Textures: 5 Best Sites

by John Gough

Poppies (with free textures) / John Gough / Canon EOS R

Where can you find free textures, to use with Photoshop to add interest to your images?

Adding textures can lift your image from a straightforward photograph into the realm of digital artwork. If you have never tried it before then a good place to start is this YouTube video from Photoshop Cafe.

When it comes to finding textures there are three options: make your own. Purchase textures, I have bought textures from Sue Woollard, because they particularly suit flower photography. Or download textures that you don’t have to pay for.

Over the years, I have come to rely on these five sites to download textures for free.

Freestocktextures.com

Huge range of textures at this site. These are free to use commercially. There is a limit of 5 downloads a day, which increases to 50 downloads a day if you create an account. Which again is free. freestocktextures.com

Unsplash.com

Unsplash is a site where photographers can upload photographs which in turn can be downloaded for free. There is a massive range of images on this site, which are free to be used commercially. This site is a photographer’s exchange so why not submit pictures as well as download. Go to the site and search for textures there are hundreds to choose from. unsplash.com

Pexels.com

Pexels is another community site. You can. You don’t have to. Upload images and you are free to download images. The images can be used commercially. You can credit the photographer, but it is not necessary. There are many different texture categories. pexels.com

Texturify.com

This is as its name implies is a site dedicated to textures and they are all free. The site was created for CGI designers who require different backgrounds for animations, films and games etc. However, it is a great resource for photographers. So on this site, there are less abstract textures and more actual photographs of metal, wood, brick and concrete etc. The images are free to use even commercially. texturify.com

Flickr

Flickr was one of the first photography hosting sites. This has now grown into a vast photography community with millions of accounts and billions of photos. As a result, the site can be an excellent source of imagery. Photographers have posted thousands of textures which are fully downloadable. Search for textures, and use the dropdown on the top left to refine by the type of licence. There are over 300K images with no known copyright restrictions. flickr.com

There are lots of other ‘free’ looking sites out there, but they often come with a sting in the tail, to part you from your money

Free Textures: Tips

Textures in Photoshop

There are textures available to use in Photoshop, but they are difficult to find. Go to Window>Extensions>Adobe Paper Texture Pro

Changing Texture Colour

Keep the texture but change the colour. It is often useful to be able to take creative control of the colour. Here is how in Photoshop.

  • Open the texture image.
  • Turn the image to monochrome: Image>Adjustments>Black and White>OK.
  • Adjust to reveal the texture: Image>Adjustments>Brightness/Contrast – bring the brightness up and take the contrast down >OK
  • Change colour: Image>Adjustments>Hue and Saturation>tick Colorize – change the colour using the sliders >OK

My Library in Photoshop

To store textures in Photoshop try using Libraries. Window>Libraries.

Filed Under: Journey, Photography, Photoshop, Post Processing, Visual Art Photography Tagged With: Post Processing

PHLEARN 30 Days of Photoshop

by John Gough

One of the best resources on the web for learning Photoshop is PHLEARN. Now they have a free 30 day course online, which they say takes you from the basics to more complicated stuff.

I thought it may be useful because I have learnt my Photoshop piecemeal, as I moved from solving one issue to the next. Perhaps, therefore, an overview was overdue.

So if you have resolved to learn more Photoshop in 2020, this is a good start. So get started here.


Camera Wrist Strap

I have avoided dropping my camera so many times using a simple inexpensive wrist strap like this one. Cameras and expensive lenses do not bounce!

UK

USA


Filed Under: Journey, Photography, Photoshop, Post Processing Tagged With: Learning Photography, Photoshop, Post Processing

New Object Selection Tool in Photoshop

by John Gough

Photoshop will soon have a new cut out tool which Adobe is calling the Object Selection Tool.

YouTube videos on the subject of cutting out objects from their backgrounds will try to persuade you that the marquee or lasso tools make selecting things easy. Perhaps it does with the simplest of subjects, but generally, I resort to a painstaking multi-click marathon with the pen tool.

How Does the Object Selection Tool Work

Adobe is using AI to make the process easier as the video from Adobe above demonstrates. Drag the rectangular marquee or lasso over the subject to be selected and Sensei the Adobe AI engine can distinguish the subject from its background.

By just selecting the general area of the things you’d like to include or exclude, Sensei identifies the correct subject and snips a precise selection around it. 

“It’s like it reads your mind and shrink-wraps the object with the selection,” says Adobe’s Meredith Stotzner in the video.

When will The Object Selection Tool be Implemented

Adobe will not be drawn, (no pun intended) but anytime soon seems to be the answer.

Filed Under: Journey, Photography, Photoshop, Post Processing Tagged With: Post Processing

Welcome to 2019

by John Gough

Two Trees / John Gough / iPhone 7


It is ironic that the first pictures I take in 2019 were taken on a smartphone. I have never been an advocate of iPhone photography for ‘serious’ work, but I was obviously up my own arse.

Over the holiday, I have been following artists like Glenys Garnett who have inspired me to do more with layers and blending modes this year.

Welcome to 2019 and a Happy New Year.


Filed Under: Journey, Landscape, Photoshop

Silver Efex Moody Monochrome

by John Gough


silver efex

Coffee at The Mitre / John Gough / Sony a6300

I was out and about in Cambridge yesterday with my camera, and I was accosted by an elderly lady. She thought that because I was carrying a camera, I must be a snoop from the council. That is just one of the hazards of street photography. Had I been carrying a big DSLR, she would have assumed I was a proper photographer. However, a small camera like the Sony a6300 can unfortunately make you seem like a furtive fellow.

The picture above was taken there. The couple look delighted to have been caught on camera. I was having a good day!

The Google Nik Collection including Silver Efex Pro2

I created the moody monochrome image using Silver Efex Pro2, from the Google Nik Collection.

The Google Nik Collection is the best free resource for photographers available on the web. In 2016 when Google decided not to support the software further, it went on to provide the software free to photographers. This was both good and bad news. The software was free, but it was never going to to be updated. However, a month or so ago it was agreed that DxO acquire the Nik Collection, and fortunately they plan to continue to develop it. A revised version will be available mid 2018.

It is still possible to download the existing software, including Silver Efex for monochrome post processing here.

Silver Efex Pro2

This is a note to myself about how the image was processed.

Lightroom

In Lightroom, there are the usual workflow: exposure, sharpness and white balance adjustments to process from RAW. The image was then desaturated to -31, the vibrance taken down to -29 and the clarity pushed up to +71. Reducing the colour to provide a dark and moody presence.  I also added a shallow tone curve and imperceptible vignette.

Photoshop

Removed the reflection of myself and used the burn tool to tone down the interior of the pub, reducing lights and reflections.

Silver Efex

Processed to mono using preset 23 Wet Rocks and film type Agfa APX Pro 100.

Conclusion

To achieve that look, without Silver Efex would be impossible for an amateur retoucher like myself. Furthermore, in the distant analogue days it would have taken hours of work in the darkroom to achieve the same results.


Learn more:


Filed Under: Journey, Lightroom, Nik Collection, Photography, Photoshop, Post Processing, Silver Efex, Sony a6300, Street Photography Tagged With: Post Processing

How to Make Your Photos Pop

by John Gough

I recently entered an event at Bedford Camera Club, where we were presented with six photographs in RAW. Our objective was to process three images and present back how we did it. These are my notes, about how I went about trying to make these photos pop in Lightroom and Photoshop. I have not explained the technical details, but I have included some links to all the technical information..

Amazon have a good deal on Lightroom and Photoshop at the moment:


Image 1. How to make Your Photos Pop

This is the first image in RAW. Looks very drab and ordinary, BEFORE processing.

How to make your Photos pop

Image 1 BEFORE

The Issues with this Image

The picture is grey and washed out. There is no detail in the sky. There is no real focus on what the subject is. There is too much foreground. The edges are messy. The detail in the pebbles and brickwork are lost.

Processing in Lightroom and Photoshop

  1. Import the RAW file to Lightroom CC.
  2. Crop to A4 (Custom size 2.1 x 2.97) tightening the view to concentrate on the fishing boats. Excluding the motor boat on the right.
  3. Straighten the horizon. The roof in the background is not flat
  4. Check exposure. This image looks around a third of a stop under exposed
  5. Add contrast to make the image less flat
  6. Launch a Develop Lightroom preset. Here we are using my user preset for landscape
    1. Highlights -100 Shadows +100
    2. Adjust the whites and blacks by holding down the alt key (Windows)
    3. Move the Clarity / Vibrance / Saturation sliders to suit the effect required.
    4. Tone Curve.  Again to suit effect. Try an S curve
    5. Sharpening and Luminance around 30-45
    6. Tick Lens Correction and Enable Profile Correction
  7. Check the white balance. Take the dropper and pick a neutral grey colour. This will set the white balance.
  8. Move the image to Photoshop. Photo>Edit in>Edit in Photoshop CC
  9. Clone out the distracting speed boat on the right.
  10. Use the Dodge Tool to lighten the foreground and under the boats
  11. Use the Burn Tool just to add some detail back into the buildings and the decks of the boat
  12. To replace the sky. Erase the existing sky. Select>Colour Range>Fuzziness c’139. NB this method avoids having to somehow cut around the masts and rigging
  13. Use Erase tool to take out any remaining sky.
  14. Select an image with sky and add as a layer. Blend with the existing layer
  15. In Photoshop save. Image then available in Lightroom
  16. In Lightroom recheck the white balance / exposure /contrast etc for the new merged image
  17. Add a Post Crop Vignette that is there but not visible e.g. -14
  18. Save the image as a JPG

How to make your photos pop

Image 1 AFTER


Image 2 How to make Your Photos Pop

This is the second image in RAW. At least there is some interest in this image, but despite the magnificent architecture, it is drab and unexciting.

how to make a photo pop

Image 2 BEFORE


The Issues with this Image

This image has an odd sepia cast, as if the white balance needs correction. The detail in the sky is probably not worth trying to recover and could be replaced. The picture is dark and lacks detail. There is no real focus on the subject, the photograph is not about the two pigeons in the foreground.

Processing in Lightroom and Photoshop

  1. Import the RAW file into Lightroom CC
  2. Crop to A4 and lose the foreground
  3. Check exposure. This image looks around a third of a stop under exposed
  4. Add contrast to
  5. Launch a Lightroom preset (see above)
    1. Clarity / Vibrance / Saturation important to get some colour from the bland landscape.
    2. Manipulate the tone curve to get some detail
  6. The tower looks as though it is leaning backwards
    1. Go to the Transform tool
    2.  Use the vertical slider to -20 to correct
  7. Move the image to Photoshop. Photo>Edit in>Edit in Photoshop CC
  8. Use dodge and burn tools to create different light in the piazza, and to the buildings left and right
  9. Erase the sky. Select>Colour Range>Fuzziness (see above). This will preserve the building tracery on the buildings to the left and the spires and crosses
  10. Select an image with sky and add as a layer. Blend with the existing layer
  11. In Photoshop save. The image is then available in Lightroom
  12. In Lightroom recheck the white balance / exposure /contrast etc for the new merged image
  13. Add a Post Crop Vignette that is there but not visible
  14. The image still has an orange cast so recheck the white balance. The foreground piazza looks as though it should be grey so use the dropper to sample colour there.
  15. Save the image as a JPG

photos pop

Image 2 AFTER

Image 3 How to Make Your Photos Pop

This is the third image in RAW. There is a picture in there somewhere trying to get out.

photos pop

Image 3 BEFORE

The Issues with this Image

The detail in the columns is lost. There is no real colour so would it be better in black and white? The portrait mode makes the picture mostly pavement. The two nuns should be made the focus of the image.

Processing in Lightroom, Photoshop and Nik Silver Efex Pro2

  1. Import the RAW file into Lightroom CC
  2. Crop to A4 and change from portrait to landscape. That way we focus on the ladies walking and lose the black shadow overhead. Place ladies in the centre of the rule of thirds grid
  3. Check white balance/exposure/contrast
  4. Apply a Lightroom preset (see above)
  5. Move the image to Photoshop. Photo>Edit in>Edit in Photoshop CC
  6. Use dodge tool to reveal the detail in the columns and paving.
  7. In Photoshop save. The image is then available in Lightroom
  8. Move the image to Nik Silver Efex Pro2 which you can download for free here. Photo>Edit in>Edit in Siver Efex Pro2
  9. Select a preset from the preset library in Silver Efex.
  10. Save to move image back to Lightroom
  11. Add a Post Crop Vignette that is there but not visible
  12. Save the image as a JPEG


I am fascinated by digital post production. However, I am still very much in the foothills in the journey to master Photoshop especially. If you want to see just what can be achieved, look at the books and videos of Glyn Dewis.


Filed Under: Journey, Lightroom, Nik Collection, Photography, Photoshop, Post Processing, Silver Efex Tagged With: Post Processing

Copyright: John Gough 2022