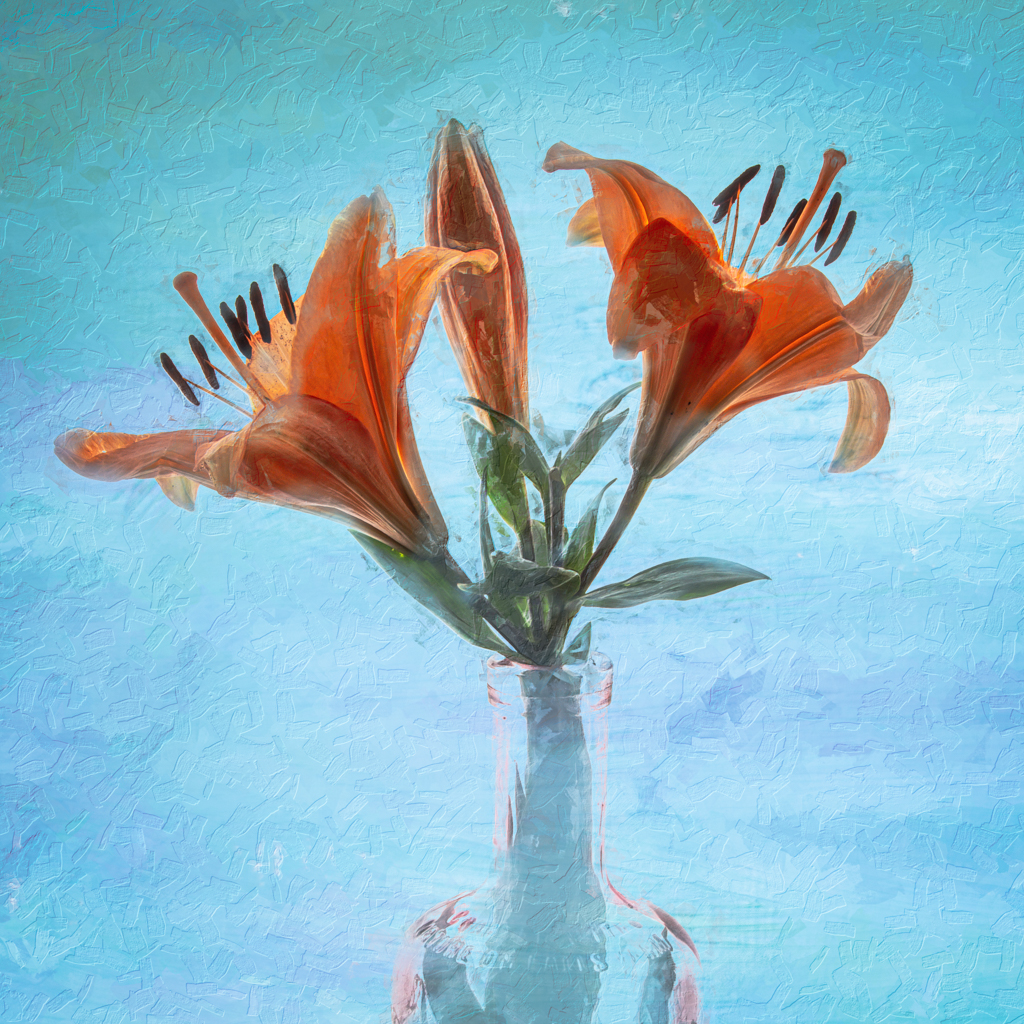
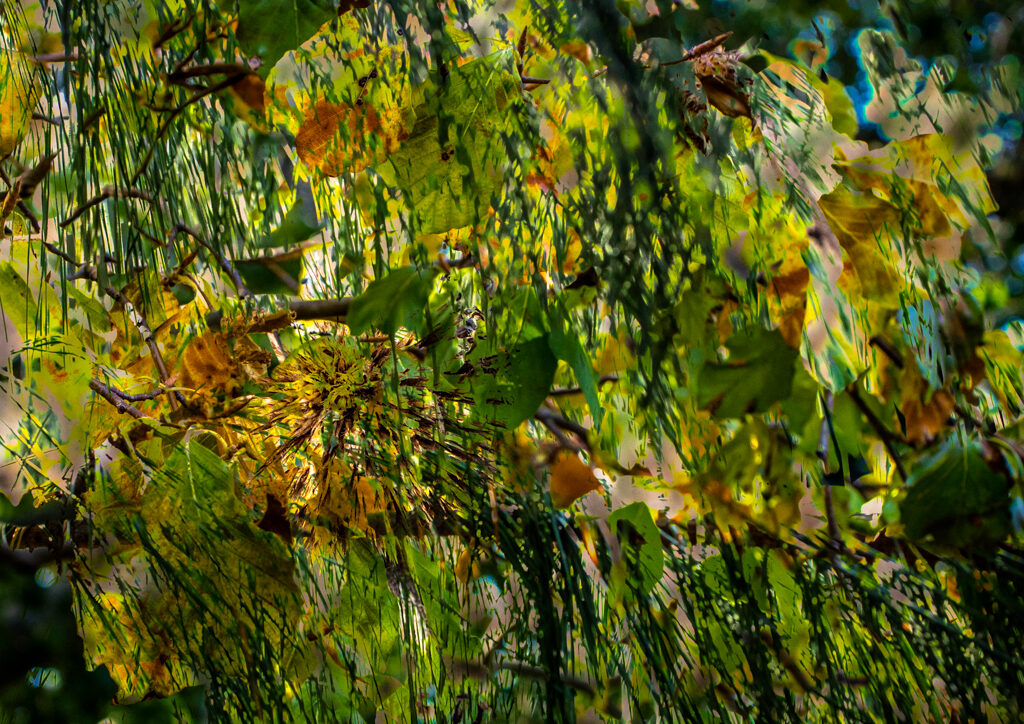
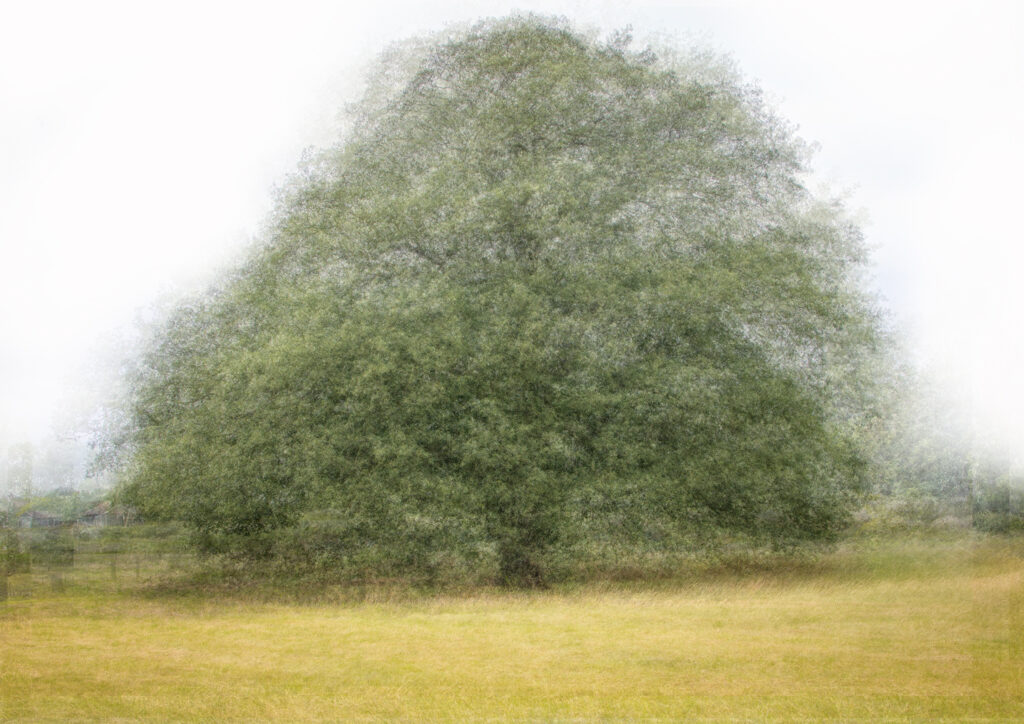
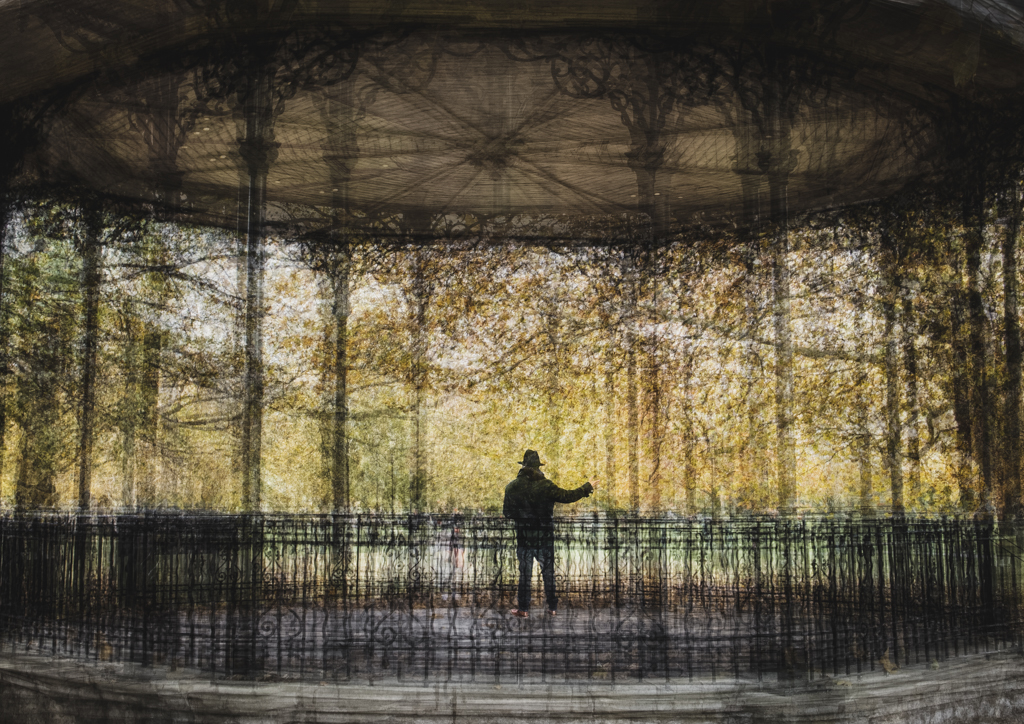
This is my image of the month for September 2020. A message in a bottle. I am currently experimenting with a bolder oil painting style to try and achieve an image which is an oil and light hybrid.
John Gough Photography
by John Gough
This is my image of the month for September 2020. A message in a bottle. I am currently experimenting with a bolder oil painting style to try and achieve an image which is an oil and light hybrid.
by John Gough
Rankin has a new show on Sky Arts, which reviews the results of a photography challenge launched in the summer to document life in 2020. In the programme, (Rankin’s 2020) Rankin demonstrates how he would tackle each assignment and with two guests reviews his images and their images.
Sky Arts is now a free-to-air channel on Freeview Channel 11.
There are six parts to the series. Each episode will focus on a different category – family, fun, self, beauty, empathy and nature.
Rankin is a renowned portrait photographer, who has now diversified into fashion, advertising and film. He is best known for working with models Kate Moss and Heidi Klum as well as photographing celebrities like Madonna, David Bowie and the Queen.
Rankin describes this project:
“Photography is my life and passion and I truly believe it has the power to reveal and connect. Now we all have cameras in our pockets, I think it’s time to use them. Rankin’s 2020 is an open call to anybody who thinks they can take a great picture. It doesn’t matter whether you’ve never taken a photograph before or you’re a professional, I want to see your view of our world. Together we can document this crazy year and make something positive out of it.”
There are now two photography based programmes on Sky Arts. I have reviewed Master of Photography, and I have watched the first episode of Rankin’s 2020. I enjoyed Rankin’s interpretation of empathy and seeing how he worked. The images submitted were also refreshing, in that they did not look like traditional photography competition entries. Many had been captured on a smartphone. They were alive, immediate and compelling.
by John Gough
Fantastic news. Sky Arts, the Sky channel, is now available on Freeview, Channel 11. The channel started broadcasting this week, which means that we can all now get to see one of their most popular programmes: Master of Photography. A photography competition, in which contestants compete with one another to gain the coveted title and 150,000 euros.
I watched the first episode this week, on Friday at 2pm. This was a repeat from the first series broadcast in 2016. I imagine the series is shown across the schedule. However, you will need to trawl through endless repeats of Tales of the Unexpected to find it.
The format is similar to The Apprentice, Masterchef and Bake Off. Twelve contestants battle it out each week, until one is eliminated. The judges are eminent photographers and there is a guest photographer to give advice. The series has been running for four seasons, and hopefully, they will all be repeated for Freeview viewers.
The contestants chosen from the ‘thousands’ that applied. In this episode, spent six hours shooting on the streets of Rome. Not all the candidates were familiar with street photography, so it was fascinating to watch their different styles. No doubt they were good photographers to win through and get a place in the competition, but the judges were ‘underwhelmed’ with the results.
It may have been the difficulty of street photography. Alex Webb the Magnum street and travel photographer was on hand to give advice. Street photography is 99.8% disappointment he said.
The best bit of advice, however, was kept until the end.
Shoot for yourselves, not what you think the judges are looking for.
by John Gough
Lately because of the COVID restrictions I have had less opportunity for street photography. I don’t want to travel on a train to London, and I have decided that pubs and restaurants are off limits for me at the moment.
So I have been looking for different outlets for my photography. My first love, landscape photography is restricted because long road trips and overnight stays are out. So it is difficult to visit the Lake District and Scotland.
So I am going to go a bit abstract.
It is just coming into Autumn. The most beautiful time of year IMHO. The next six weeks or so are going to be just so amazing. What I want to do is photograph the leaves and the trees and the sky and capture the mood. The feeling of darkening days, and ripe fruit. Hunkering in, log fires, smoky chimney pots, mellow mists and the foreboding of winter. I want to create an impression of the Autumn I see.
As Joel Meyerowitz says:
‘Once you have a camera in your hand you have a license to see.’
Abstract allows a creative control. Some would say too much. However, the end result is unique to you. It may be crass, but it is your kind of crass. A camera can give you the license to see, but abstraction gives you the freedom to feel and express emotion.
One of the most accessible ways of going abstract is to find the multiple exposure function on your camera. With this, you can create stunning abstracts in camera.
There are numerous videos that go into the technicals of ‘how to’ like this one.
You take several different images. These multiple exposures are then stored in the camera and merged to create a final image. Sounds complicated and technical, but it is not that difficult. Just have a go and experiment. Take 2, 3 or more images stacked on top of one another. See what works and carry on.
The most difficult part is finding Multiple Exposure on your camera’s menu!
The example above was taken in my local park. There are three exposures. Lengthening shadows on a white wall, autumn leaves and pine needles.
I think I will print my Autumn Abstracts. Stick them on a wall and then the next six weeks will be with me all winter
To see what you can achieve with this technique. Look no further than the work of Valda Bailey If you really want to get into Multiple Exposures then the Bailey Chinnery workshops are well worthwhile.
Now let’s get out there and enjoy the Autumn.
by John Gough
Pep Ventosa is a Catalan photographer who is known for his technique of creating impressionistic looking photography by taking multiple images of a subject and blending them together.
His series ‘In the Round’ featured trees which have become the lynchpin of his work. His photography, however, is now more diverse and includes urban landscapes, streetcars and street lamps.
When talking about his work he describes how:
The process mimics how we actually see: the eyes are constantly focusing on the specific details and elements of what’s in front of them and the brain then processes that visual information making the reconstruction so we perceive the world around us.
I have curated a selection of his images here.
Pep Ventosa uses hundreds of images to create an artwork. Is it art or is it photography? He purposefully blurs the boundaries. Look at his series ‘New Faces from the Past’
Trying to replicate the technique is not easy. As my attempt above illustrates. It is not just a process of walking around a tree, taking photographs and putting them into layers in Photoshop.
A good place to start is with the glorious Glenys Garnett
What is exciting about using the Pep Ventosa technique is that so much is down to trial and error, which means that your images will develop into your own style.
by John Gough
Where can you find free textures, to use with Photoshop to add interest to your images?
Adding textures can lift your image from a straightforward photograph into the realm of digital artwork. If you have never tried it before then a good place to start is this YouTube video from Photoshop Cafe.
When it comes to finding textures there are three options: make your own. Purchase textures, I have bought textures from Sue Woollard, because they particularly suit flower photography. Or download textures that you don’t have to pay for.
Over the years, I have come to rely on these five sites to download textures for free.
Huge range of textures at this site. These are free to use commercially. There is a limit of 5 downloads a day, which increases to 50 downloads a day if you create an account. Which again is free. freestocktextures.com
Unsplash is a site where photographers can upload photographs which in turn can be downloaded for free. There is a massive range of images on this site, which are free to be used commercially. This site is a photographer’s exchange so why not submit pictures as well as download. Go to the site and search for textures there are hundreds to choose from. unsplash.com
Pexels is another community site. You can. You don’t have to. Upload images and you are free to download images. The images can be used commercially. You can credit the photographer, but it is not necessary. There are many different texture categories. pexels.com
This is as its name implies is a site dedicated to textures and they are all free. The site was created for CGI designers who require different backgrounds for animations, films and games etc. However, it is a great resource for photographers. So on this site, there are less abstract textures and more actual photographs of metal, wood, brick and concrete etc. The images are free to use even commercially. texturify.com
Flickr was one of the first photography hosting sites. This has now grown into a vast photography community with millions of accounts and billions of photos. As a result, the site can be an excellent source of imagery. Photographers have posted thousands of textures which are fully downloadable. Search for textures, and use the dropdown on the top left to refine by the type of licence. There are over 300K images with no known copyright restrictions. flickr.com
There are lots of other ‘free’ looking sites out there, but they often come with a sting in the tail, to part you from your money
There are textures available to use in Photoshop, but they are difficult to find. Go to Window>Extensions>Adobe Paper Texture Pro
Keep the texture but change the colour. It is often useful to be able to take creative control of the colour. Here is how in Photoshop.
To store textures in Photoshop try using Libraries. Window>Libraries.
by John Gough
I recently gave a presentation about How to Achieve an LRPS.
It pulls to together some of the advice on these pages i.e 5 Tips for Passing an LRPS and LRPS One Big Tip. However, I included more about how the LRPS is assessed in this presentation. Using the criteria:
Technical Quality: depth of field / exposure / sharpness / colour rendition / processing faults
Visual Awareness: use of light / composition / viewpoint / post processing / use of colour
Communication: point of interest / creativity / decisive moment
Overall Impression: cohesive panel / printing and mounting / avoiding repetition / panel layout
RPS distinctions are too often seen as stuffy and unobtainable. However, if you are a good photographer the LRPS is achievable. It is hard work, and you will need the skill, but it is worthwhile.
It is also a great project, and projects are important in photography. Pursuing a project can push your boundaries, and get you out of your photography comfort zone. It will also develop your own creative persona and style.
The LRPS can be the start of an enlightening personal journey.
You are welcome to download How to Achieve an LRPS.
by John Gough
I have long been a fan of Glenys Garnett, her creative flower photography and landscape work are an inspiration.
I mention this because the RPS is hosting a virtual event where Glenys will be talking about creative landscapes. It will cover:
In this 60 minute presentation Glenys Garnett will give you some overview and insight into her approach to capturing and creating landscape imagery. She will share her influences and the techniques she uses both in-camera and in Photoshop to show how she goes about creating her composite landscapes.
Glenys will also explain the tools you need to make a start in developing your own creative images.
The RPS is also running an online workshop where Glenys will be talking about Making Creative Landscape Images. It is restricted to six people only, but I have written to the RPS to try and make the recordings available.
Meantime if you want to follow Glenys and sample her wonderful creative images, find her Twitter feed. There are new wonderful photographs almost every day.
To see her work I have created a Pinterest board, but it is just a sample of her vast output.
Glenys is also very generous in sharing her techniques and knowledge. You can subscribe to her YouTube feed here.
One of the things I been practising during the lockdown is to imagine a scene and then to attempt to create it. This has been more relevant during these times because our freedom of movement has been curtailed. Choosing a location, turning up and hoping an opportunity will present itself is no longer so accessible. This has made me look inward more and create with what is available.
With this in mind, as we come out of lockdown. I am going to take time to study these tutorials on YouTube and the RPS, in the hope that I can share in some of the Glenys Garnett creative magic.
by John Gough
I like to shoot flowers backlit. Like the buttercups in the image above. This was achieved using natural light through a window lightbox.
Now that we are all restricted from roaming around with our camera, the spring flowers in our gardens make fascinating subjects. With a little post-processing in Lightroom and Photoshop, simple blooms can blossom into fine art.
Over the next few blogs, I will be explaining just how I approach flower photography, starting with how to build a simple window lightbox.
The simplest way to create a uniform lighting effect is to simply stick a piece of tracing paper or baking parchment on a window. Mount, the flower in front of it and take a photograph. Job done.
I use oasis to mount the flower, which can be purchased from Amazon.
UK
As my flower photography has evolved I have created a more elaborate window lighting setup, but it still uses natural light.
As I will explain in a later episode. Cutting the flower from its background in Photoshop is best achieved with as white a background as possible. So I now use a white diffusion fabric which I clip to a window using studio clips.
Both items can be bought quite cheaply from a photography store or Amazon.
UK
UK
I usually pick flowers from my garden, or purchase them from a florist. I certainly avoid picking flowers from the wild. Bringing flowers indoors and photographing in a ‘studio’ environment gives ultimate control over the image.
Over the next few weeks I will be working through the process I use to create fine art flower images. This is episode 1.
I have avoided dropping my camera so many times using a simple inexpensive wrist strap like this one. Cameras and expensive lenses do not bounce!
UK
USA
by John Gough
Below is a newsletter written by my friend Ian Whiting, which will resonate with all photographers who are self isolating, or stuck at home during this coronavirus nightmare that we all are sharing.
If you are looking for something to do when it is raining (or after you have finished redecorating the house) there are many good, photographic, video tutorials on the net. Some sites worth exploring…
Creative Live – Many paid, classroom style tutorials running from 1 hour to 3 days each. If you purchase a course it can be watched online or the videos downloaded to your PC; I suggest you do the latter as one never knows if the organisation will go out of business. Be aware, some are a few years old, I suggest you find the last page of the reviews to see when the first review was posted, if you are learning a software package, e.g. Photoshop, an old tutorial will be using an older version of the software although the content may still be relevant. They run a daily free viewing of one of their tutorials, usually starting at about 4pm or 5pm and running on a repeat loop until the next afternoon. You can find the current list of free videos being run from the CLASSES > ON AIR NOW menu. They also do a monthly and annual subscription deal whereby all videos are available online for that month/year.
Adorama – This is a photographic shop based in New York, USA. They have many free video tutorials on their Adorama TV YouTube channel. These run from 3 minutes to 90 minutes long.
B&H – This is also a photographic shop based in New York, USA. They have many free video tutorials on their B&H Events site. These are often 60 to 120 minutes long by very well known photographers.
Adobe TV – Many free tutorials on Photoshop and Lightroom
The Photoshop Training Channel – Run by Jesus Ramirez, many free and some paid tutorials on Photoshop, well worth learning new techniques from
The BBC I-Player has interesting programmes on Photography in general, try: The Genius of Photography (5 years old, no longer on I-Player but this archive site has it) and The Age of The Image (also currently on BBC 4) – Harry Birrell Presents Films of Love and War
The Open University has some free courses and articles: Detecting Fake Images – Reading Visual Images – Designing the User Interface, Text, Colour, Images… – Word and Image – A Brief History of the Lens – Seeing a Life Through a Lens
Many more ideas on our BCC Resources page under TUTORIALS and our BCC How To page
Remember it will end. Stay safe.