• Home
  • Images of the Month
  • My Notes
  • About
  • Contact
    • Privacy Policy

iJourneys

John Gough Photography

Your Canon Camera as a Webcam

by John Gough

Your Canon Camera as a Webcam

Canon has launched a new piece of software that will enable your Canon camera as a webcam.

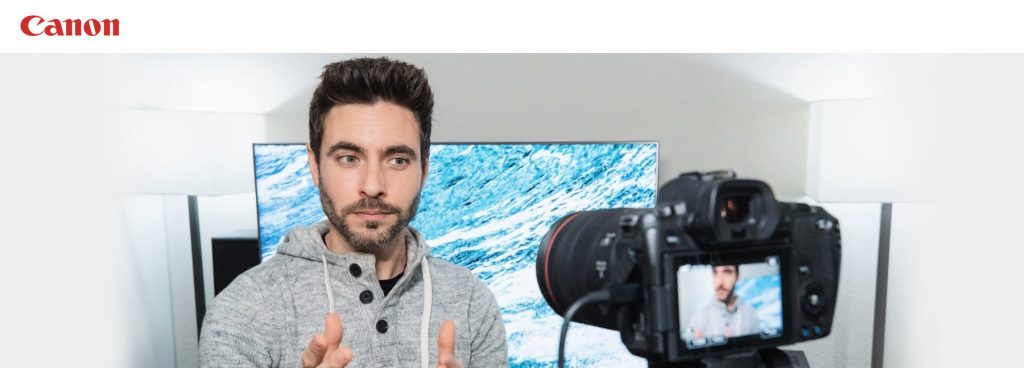
We are all spending more time on Zoom and Skype both for work and social interaction during lockdown. Usually, we rely on the tiny camera on our laptop, but what if we could use our DSLR?

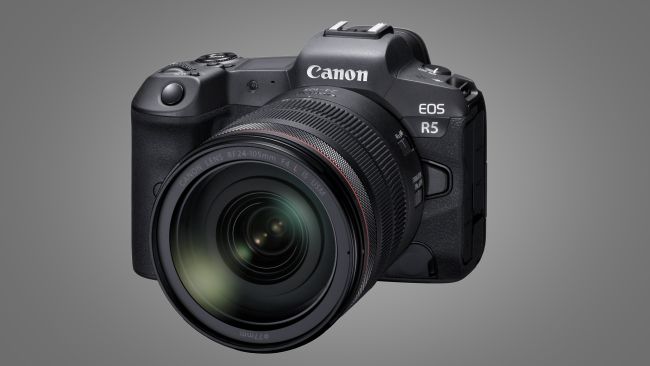
Well if you have an EOS or Powershot camera you can. This is because Canon has released, EOS Webcam Utility Beta, and with this software, you can use your Canon camera as a webcam. Initially, the software is just for Windows 10.

According to their press release:

“In unprecedented times, it’s imperative for Canon to provide our customers with useful, simple and accessible solutions to assist them in whatever imaging needs they have,” said Tatsuro “Tony” Kano, executive vice president of the Canon U.S.A., Inc. Imaging Technologies & Communications Group. “Our goal is that the EOS Webcam Utility Beta software can help reduce some of the remote workday stress for employees who are tasked with video conferencing and virtual meetings.”

I have a desktop PC that I use for photo editing and a laptop that I use for Zoom because it has a camera and mic. However, now that you can use your Canon camera as a webcam, I have decided to add Zoom to my desktop. I am now setting this up using my Canon EOS R, and I will take you through my experience step by step. This guide, however, should work for any Canon camera on the list below.

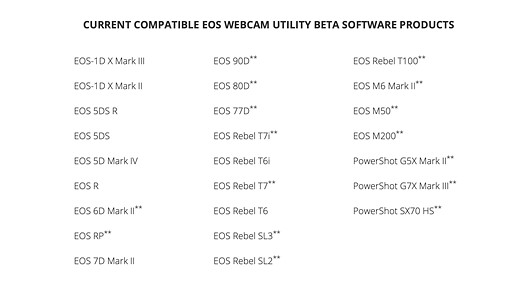
Which Canon Camera can be used as a Webcam

Canon Camera as a Webcam. Source: DPReview

Where to Download the Software

Download the software required on your PC from here. There is a link on this page for each supported camera. It is easy to download. Remember to restart your PC after the download.

Accessories Required

You will need a USB type-C cable. There should be one in the box if you purchased a Canon EOS R. However my desktop computer does not have a USB-C port. So I purchased a USB type-C to A cable.

Purchase this from Amazon here in the UK and here in the USA.

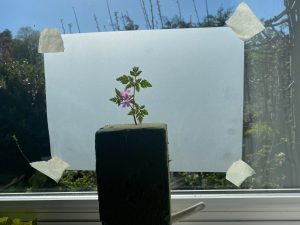
A small stand for the camera is useful. I purchased this Z flex stand which has not been off my camera since I bought it because it is so useful for those lockdown still life projects.

In the USA a similar stand is:

As my desktop did not have a microphone so I purchased this:

In the USA it is here.

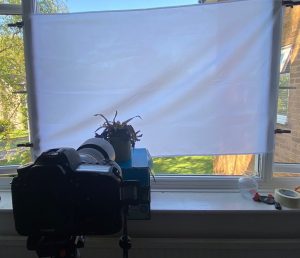
Setup the Canon Camera as a Webcam

Once you have downloaded the software connect the camera to the computer via the USB cable.

Turn the camera on, and turn to Movie Mode. This can be set with the camera’s Mode Dial.

If you have not used the Movie Mode on a Canon EOS R before it may be hard to find. This is how I found it.

Open your conferencing app e.g Zoom or Skype and choose “EOS Webcam Utility Beta” as the video feed.

Connect your microphone. NB there is no audio feed from the camera.

Troubleshooting

It is likely that the video conferencing will not work and you get this screen.

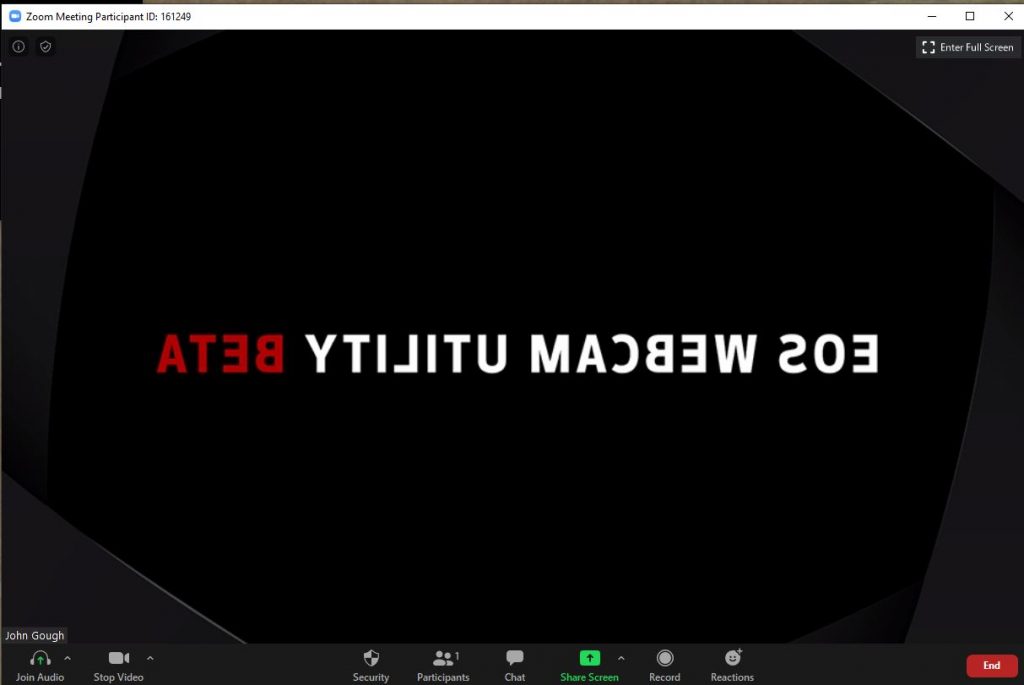
This is because you have EOS Utility running which is intercepting the video feed.

If you do not use EOS Utility go to Settings>Apps on your PC and uninstall. If you use the EOS Utility software right click on the systems tray, choose Task Manager and right click to end the task.

I found this fix here So cheers Tech Gear Talk

Resources

A Canon forum where users share feedback.

Canon download and installation instructions

YouTube video with installation instructions from Canon

Have fun.


Camera Wrist Strap

I have avoided dropping my camera so many times using a simple inexpensive wrist strap like this one. Cameras and expensive lenses do not bounce!

UK

USA


Filed Under: Canon Cameras, Canon EOS R, Gear, Journey Tagged With: Canon Cameras

Building a Lockdown Lightbox

by John Gough

I like to shoot flowers backlit. Like the buttercups in the image above. This was achieved using natural light through a window lightbox.

Now that we are all restricted from roaming around with our camera, the spring flowers in our gardens make fascinating subjects. With a little post-processing in Lightroom and Photoshop, simple blooms can blossom into fine art.

Over the next few blogs, I will be explaining just how I approach flower photography, starting with how to build a simple window lightbox.

Simplest Simple Window Lightbox

The simplest way to create a uniform lighting effect is to simply stick a piece of tracing paper or baking parchment on a window. Mount, the flower in front of it and take a photograph. Job done.

Simplest Lightbox

I use oasis to mount the flower, which can be purchased from Amazon.

UK

Simple Lightbox

As my flower photography has evolved I have created a more elaborate window lighting setup, but it still uses natural light.

As I will explain in a later episode. Cutting the flower from its background in Photoshop is best achieved with as white a background as possible. So I now use a white diffusion fabric which I clip to a window using studio clips.

Both items can be bought quite cheaply from a photography store or Amazon.

UK

UK

I usually pick flowers from my garden, or purchase them from a florist. I certainly avoid picking flowers from the wild. Bringing flowers indoors and photographing in a ‘studio’ environment gives ultimate control over the image.

Over the next few weeks I will be working through the process I use to create fine art flower images. This is episode 1.

Camera Wrist Strap

I have avoided dropping my camera so many times using a simple inexpensive wrist strap like this one. Cameras and expensive lenses do not bounce!

UK

USA

Filed Under: Flowers, Journey, Painterly, Photography, Visual Art Photography Tagged With: Painterly, Projects, Visual Art

LRPS One Big Tip

by John Gough

ARPS Panel / John Gough

You may have some time on your hands at the moment and be thinking that now is the time to put that panel together to gain a Royal Photographic Society distinction like the LRPS.

If so, I have one big tip for you. I cannot guarantee this tip will get you that distinction. However, this has worked for me and for many others.

Although I gained my LRPS at the first attempt, it took me three tries to get my ARPS. It wasn’t until I the third time that I realised I was approaching the RPS Assessment Day blind. I was putting my work in front of those judges with the odds stacked against me. The judging panel was demanding perfection, but I could not be certain that my images were perfect. I was not fully in control, I was leaving too much to chance.

For the RPS distinction the LRPS, you are required to create 10 images. Mount them and create a hanging plan which will show the RPS how to present the pictures to the RPS judges. The ten images are referred to as a panel.

For the ARPS a panel of fifteen images is required.

What is the Tip?

The tip will sound simple, but I want to explain why it is smart and why it will give you the edge.

I am assuming here that you have been on an RPS Advisory Day, and that you are fairly confident that you have a selection of images that will make the grade.

Do you have pictures that are well composed, and are technically excellent? Are you sure? This article may help you ensure you have the basics covered.

The advice below is about that last few percent, that tiny difference between a pass and failure.

So what is it?

My one big tip:

Print your images and stick them on your wall.

Yes. I know it sounds simple, but it is KISS.

Keep It Simple Stupid.

This is one simple tip with big implications. Small input, big outcome. Let me explain.

Why Print Your Images Before the LRPS Assessment?

Screen or Print

Looking at your images on screen does not always give a good representation of how your pictures will look when printed.

An image can look sharp on screen, but not quite as sharp in print.

Shadows and highlights that look perfectly controlled on the screen may print differently.

You may have cropped the image but failed to notice something at the edge of the image that is distracting. Holding the print and examining it in close detail will throw up those errors.

Colour casts are not easy to see on screen, but easier to see on the print.

There may also be artefacts, odd squiggles that are not apparent on the screen but appear on the print.

If you go along to an LRPS Assessment, you will notice the judges picking up each print and almost putting the print to their noses to try to spot mistakes. If you have printed your images and corrected faults and reprinted. Then you increase your chances that the judges will find no faults.

Consistency

Consistency is important for the LRPS, and even more important for the ARPS. Where the judges are looking for a common look and feel, and photographer input. So it is important not to, for example, have one image over saturated and another pale and washed out. One painterly and the others tack sharp

It is not always easy to spot these differences on a screen. If however they are printed and presented in front of you, the inconsistencies will jump out.

Why Stick Your Images On your Wall? 

The judges will be looking at your panel in it’s entirety. You will notice at the start of the assessment the judges will sit for a minute or two before they get up to look at individual photographs. They are at this point assessing the whole panel. 

A LRPS panel is often referred to as the eleventh print, and is judged along with the other ten.

You could arrange your hanging plan on the computer, print your images and arrange them on the floor or on a table top, but nothing beats sticking them on the wall and seeing them as the judges will see them.

If it works?

If this one big tip works with either the LRPS or ARPS why not share how it worked for you. You can contact me here.


Camera Wrist Strap

I have avoided dropping my camera so many times using a simple inexpensive wrist strap like this one. Cameras and expensive lenses do not bounce!

UK

USA


Filed Under: Journey, LRPS, RPS Tagged With: LRPS, RPS Distinctions

Photography Video Tutorials

by John Gough

Pandemic / John Gough

Below is a newsletter written by my friend Ian Whiting, which will resonate with all photographers who are self isolating, or stuck at home during this coronavirus nightmare that we all are sharing.

If you are looking for something to do when it is raining (or after you have finished redecorating the house) there are many good, photographic, video tutorials on the net. Some sites worth exploring…

Creative Live – Many paid, classroom style tutorials running from 1 hour to 3 days each. If you purchase a course it can be watched online or the videos downloaded to your PC; I suggest you do the latter as one never knows if the organisation will go out of business. Be aware, some are a few years old, I suggest you find the last page of the reviews to see when the first review was posted, if you are learning a software package, e.g. Photoshop, an old tutorial will be using an older version of the software although the content may still be relevant. They run a daily free viewing of one of their tutorials, usually starting at about 4pm or 5pm and running on a repeat loop until the next afternoon. You can find the current list of free videos being run from the CLASSES > ON AIR NOW menu. They also do a monthly and annual subscription deal whereby all videos are available online for that month/year.

Adorama – This is a photographic shop based in New York, USA. They have many free video tutorials on their Adorama TV YouTube channel. These run from 3 minutes to 90 minutes long.

B&H – This is also a photographic shop based in New York, USA. They have many free video tutorials on their B&H Events site. These are often 60 to 120 minutes long by very well known photographers.

Adobe TV – Many free tutorials on Photoshop and Lightroom

The Photoshop Training Channel – Run by Jesus Ramirez, many free and some paid tutorials on Photoshop, well worth learning new techniques from

The BBC I-Player has interesting programmes on Photography in general, try: The Genius of Photography (5 years old, no longer on I-Player but this archive site has it) and The Age of The Image (also currently on BBC 4)  –  Harry Birrell Presents Films of Love and War  

The Open University has some free courses and articles: Detecting Fake Images  –  Reading Visual Images  –  Designing the User Interface, Text, Colour, Images…  –  Word and Image  –  A Brief History of the Lens  –  Seeing a Life Through a Lens

Many more ideas on our BCC Resources page under TUTORIALS and our BCC How To page

Remember it will end. Stay safe.

Filed Under: Journey, Photography, Photography Techniques Tagged With: Learning Photography

Canon EOS R5 What You Don’t Know

by John Gough

Canon EOS R5 (Image credit: Canon)

This is my research about the Canon EOS R5. The camera is not released yet. So there are some details about the camera that we know, and there are other details that are still rumours and we don’t know.

My thanks to Canonrumors for what we don’t know.

Specification: Canon EOS R5

  • Newly designed 45MP full frame CMOS sensor rumoured A sensor of this size is evidently required for 8K video.
  • 20fps electronic shutter burst or 12fps mechanically confirmed
  • In body stabilisation (IBIS) confirmed up to eight stops rumoured “a newly Canon-developed, in-camera image stabilization system – which works in combination with the lens stabilization system, making sure that whatever the situation stills and video content captured is shake-free.”
  • Builtin WiFi confirmed. 5GHz ?
  • Bluetooth 5.1 rumour
  • Dual card slots confirmed. One or both slots are CFexpress rumour.
  • Similar battery to the 5D Mark IV rumour.
  • 8K video confirmed @30fps unconfirmed 4K @ 120fps unconfirmed.

Differences with the Canon EOS R

I have moved to the Canon EOS R from Sony. I know the camera very well so I am not surprised at the rumoured design changes. These are what users have been asking for:

  • Similar size (based on photographs)
  • Multi-function bar to be replaced by a scroll wheel rumour
  • Larger capacity battery rumour
  • New Digic processor from the new Canon 1D X Mark III rumour

Positioning

This camera is being introduced by Canon as a professional mirrorless camera. Their tagline is ‘Professional Mirrorless Redefined’ (confirmed). The R5 shares a similar name to the Canon EOS 5D which has had success in the professional/strong amateur market for many years. Could the Canon EOS R5 be aimed at a similar market positioning (conjecture)?

Launch

The Canon EOS R5 will be on show at The Photography Show in Birmingham. (confirmed). The launch date is July 2020 in time for the Olympics in Japan (rumoured). The timing is tight, as many professionals have not yet made the move to mirrorless. The Canon shooters amongst them will likely be using the new Canon 1D X Mark lll.

There is a distant rumour that Canon are working on the Canon EOS R1 for launch in 2021.

The advantage of the R5 at the Olympics would be the 8K video. Which would allow quality stills to be produced from 8K footage. (Is this true?) Canon reportedly said that it is possible to “extract high-resolution still images from video footage”.

The recently launched Samsung Galaxy S20 smartphone does this. As they say on their website: “Shoot videos in 8K resolution at a huge 24FPS. And with Single Take, turn them into 33MP stills in an instant”.

Pricing

There is no confirmation on pricing, but the Canon EOS 5D is priced at £2549 body only. The EOS R5 is likely to be a similar price plus a premium e.g £3K (conjecture).


Camera Wrist Strap

I have avoided dropping my camera so many times using a simple inexpensive wrist strap like this one. Cameras and expensive lenses do not bounce!

UK

USA


Filed Under: Cameras, Canon Cameras, Canon EOS R, Gear, Journey Tagged With: 8K video, Canon, Canon Cameras, EOS R5, IBIS, mirrorless

Canon RF 24-240mm Lens Review

by John Gough

Canon RF 24-240mm lens

This is a review of the Canon RF 24-240mm lens. It is a true and accurate reflection of using my own lens in the field over several weeks.

Disclaimer

Let’s get one thing clear. I am reviewing a lens that I bought here in the UK. I have not been given the lens to review and I have not been on some Canon junket to write about the lens. This is my honest view.

Research on the Canon RF 24-240mm Lens

A big part of the fun of buying any photography equipment is the research before you buy. I shared my research on these pages both here and here.

Venice

I recently went to Venice which is a photographers paradise. I was shooting landscape and people. Although I took other lenses with me, the Canon RF 24-240 lens remained on my camera for most of the trip.

The flexibility of 24mm to a whopping 240mm is a joy. There is no thought that you may miss a shot because you don’t have the right lens. Just relax into shooting, confident that when the opportunity arises the lens can cope.

Quality of the Images

This is not an L lens so some photographers may worry that it is not top quality. In my view that may have been a problem in the past with the old EF mount. The new RF mount seems to have allowed Canon designers more flexibility to produce a better quality lens to fit the guide price. If this lens produces brilliant quality and it does, the RF L lenses are no doubt phenomenal.

However, I am not about to spend £2600 on a Canon RF 70-200mm F2.8L IS USM. When I could have three Canon RF 24-240mm lenses for the same price.

Restorante Pizzeria / John Gough / Canon EOS R

The image above is an example of the image quality. Taken at f9 at 1/1600 sec. It is possible to read the headlines on the gentleman’s newspaper and the papers in the shop doorway.

Minimum Aperture on the Canon RF 24-240mm lens

The minimum aperture on this lens is f4-6.3, which I imagined would be an issue. However, the image stabilisation on this lens more than offset that concern immediately. Canon claim it is five stops.

Gondolas Venice / John Gough / Canon EOS R

The image above was captured at 0.6 seconds in the early morning. There is no shake visible.

Distortion and Vignetting

Distortion and vignetting are apparent on this lens and was certainly a reason for some reviewers to unfairly criticise the lens. In my view, lens distortion is not a problem. As I wrote in an earlier post here.

Superzoom lenses are fantastically convenient, but notoriously difficult to build. As a result Canon have taken a leaf out of Apple, Samsung and Hauwie’s playbook and made a good lens a great lens with the addition of sophisticated algorithms.

24mm RAW Image with distortion
Corrected in Lightroom

As shown above, the RAW image is corrected perfectly in Lightroom. Just remember to include in presets or build into a workflow. The in-camera software will automatically do the same for JPEG images.

Usability

The lens is light considering the amount of glass at just 750g and feels well balanced on the R. It is plastic but feels solid and the zoom ring is smooth in operation.

The zoom ring can double as a control ring using a switch on the side of the lens. The control ring is one of my favourite features of the RF system. I set mine to exposure compensation.

Focussing with the silent Nano USM motor is fast. I did not experience any hunting.

It would be useful if the lens was weatherproofed.

Conclusion

As a street and urban photographer, this lens is perfect for wandering the streets and capturing people and situations. When you get to work with a 10x zoom, you have got to ask yourself, ‘Is it really worth carrying a bag of expensive lenses with you?’

This is not just a travel lens it is an everyday lens. I know I use it every day.

UK

USA


Camera Wrist Strap

I have avoided dropping my camera so many times using a simple inexpensive wrist strap like this one. Cameras and expensive lenses do not bounce!

UK

USA


Filed Under: Canon Cameras, Canon EOS R, Equipment, Gear, Journey, Lightroom Tagged With: Canon Cameras

Photography Online

by John Gough


Photography Online is a photography channel on Youtube which produces a magazine show which is aired monthly. There have been two episodes so far (as at 10th Feb 2020) and I was impressed with both.

It assumes the viewer has some knowledge because so far there has not been a piece on ‘How to Get Out of Auto’. It moves at a decent pace, and all the presenters are professional and seem to know what they are talking about.

It is more broadcast television quality, rather than the typical YouTube blogger, speaking to a camera mounted on a pile of books in his bedroom.

So far it has mainly been focussed on landscape and wildlife, but that is just the start, and to be fair that’s what most photographers are into. It also dares to delve into post processing, so there is not the evangelising to do everything ‘in camera’ which is a relief.

New episodes will be released on the last Sunday of each month, I have embedded the February episode above and below there is a meet the team introduction.

Enjoy.


Camera Wrist Strap

I have avoided dropping my camera so many times using a simple inexpensive wrist strap like this one. Cameras and expensive lenses do not bounce!

UK

USA


Filed Under: Journey, Photography, Photography Techniques Tagged With: Learning Photography

Joshua K Jackson

by John Gough


Joshua K. Jackson is a British photographer based in London, Working in colour, photographing everyday life in the capital. His work has been published worldwide and exhibited in the UK, USA and Europe.

Check out this series of videos about street photography and the work of Joshua K Jackson, promoted by Adobe.


Camera Wrist Strap

I have avoided dropping my camera so many times using a simple inexpensive wrist strap like this one. Cameras and expensive lenses do not bounce!

UK

USA


Filed Under: Journey, Lightroom, Photographer, Photography Tagged With: photographers

Bruce Davidson

by John Gough

Show me a grainy black and white photograph from the 1960s and I am sold. Which is welcome, because the work of Bruce Davidson is now on sale at Huxley-Parlour in London

I love the documentary photography of that time. Especially the work of Tony Ray-Jones, Marketa Luskacova, David Hurn, and Don McCullin.

Bruce Davidson [Magnum Photos] came to the UK from the States in the 1960s. On an assignment from Queen magazine to go and photograph the British.

Bruce Davidson Shoots the British

Driving around the country in a Hillman Minx for two months. He was able to capture the country as it transformed from pre-war to post-war. Gritty in many industrial areas that had not changed since the 1930s. A country still riven by class but changing rapidly.

“They gave me carte blanche because Cornell Capa told them, ‘If you want to get a beautiful set of pictures, let him take off. You will be surprised.’ And that’s what I did,” Davidson says.

His pictures were first published as Seeing Ourselves as an American Sees Us: A Picture Essay on Britain on April 12, 1961. “I was free to encounter life,” Davidson says. “I was open and didn’t have any agenda. There was a certain sense of sky and fog, of another place. That’s why those pictures are delicate – and I was delicate too. “

I have curated some of his photographs from that trip here.

Exhibition

You can visit the Bruce Davidson exhibition A United Britain. At Huxley-Parlour in Swallow St, between the 17th Jan and the 14th March.


Camera Wrist Strap

I have avoided dropping my camera so many times using a simple inexpensive wrist strap like this one. Cameras and expensive lenses do not bounce!

UK

USA


Filed Under: Journey, Photographer Tagged With: photographers

Royal Picture Looks Odd

by John Gough

Queen and heirs to the throne.

This is a photograph taken by Ranald Mackechnie of the once and future queen and kings. For many of us, the fact that the feudal relic of a monarchy has lasted into the 2020s is a glaring anachronism, but since the Prince Andrew disgrace and Prince Harry’s exile in Canada. The royals have gone into overdrive to present an ‘its all alright’, continuity theme.

Last month they were pictured in exactly the same outfits stirring Christmas puddings in palace’s Music Room. The Music Room which obviously doubles as a kitchen in polite society. Featured a number of regal decorations, including a crown, corgi, a throne, and a soldier.

This picture was taken on the same day as a Christmas lunch hosted by the Queen for the rest of her family. We know Prince Andrew attended whilst waiting for a call from the FBI. We also know that Prince Harry was on the other side of the world, with Mrs Markle and Lord Archie

This is the background to a very awkward photograph.

Too Tetchy

Mackechnie is a portrait photographer, used to getting a single sitter in front of the camera. But as we know from wedding photography getting a royal group together is like herding lizards.

The Queen and the Duke of Cambridge smile obediently. The Prince of Wales can only manage a grimace. It has been a bad year, he is waiting for his lunch and is obviously in one of those “bloody reporters” moods.

His Royal Highness Prince George of Cambridge has picked up his grandfather’s vibe and has a disdainful smirk on his little face, aimed at the photographer. As Prince Philip used to say of Antony Armstrong-Jones, “just a common snapper”.

Too Red and Too Fussy

No photographer would have chosen a dark location with claret red walls and carpet. The stairs at Buckingham Palace were obviously suggested as a useful device to ensure that Prince Charles looked as tall as his son and heir.

The red background sucks in all the available light, which makes lighting the shot a nightmare. The background is also too fussy, why leave the chair to the left? It is just distracting. There is also a sculpture under Prince Williams elbow and a column growing out of his head. The chandelier does help to frame the composition, but the photographer has had to add a strong vignette to hold interest in the royal bloodline.

Too Contrasty

The whites are too white and the darks too dark. The Queen’s dress is one blown highlight, there is no detail, even her left arm blends into her body. Prince Williams suit is too dark with no detail at all. Prince George’s legs are stuck together and his shoes are fused to his trousers. The shadows are all very black.

There has been a lot of dodge and burn in Photoshop to turn this dull image into something that is less dull.

All these features combine to create something odd as well as odious


Camera Wrist Strap

I have avoided dropping my camera so many times using a simple inexpensive wrist strap like this one. Cameras and expensive lenses do not bounce!

UK

USA


Filed Under: Journey, Photographer, Photography Tagged With: photographers

« Previous Page
Next Page »

My Latest Notes About Photography

  • Remembering Martin Parr
  • Let them Shoot JPEGS
  • I Am Martin Parr
  • Lightroom Presets Using ChatGPT
  • Experience Saul Leiter

What’s in My Notes

Copyright: John Gough 2025