• Home
  • Images of the Month
  • My Notes
  • About
  • Contact
    • Privacy Policy

iJourneys

John Gough Photography

Sony a6300 Setup

by John Gough

a6300 setup

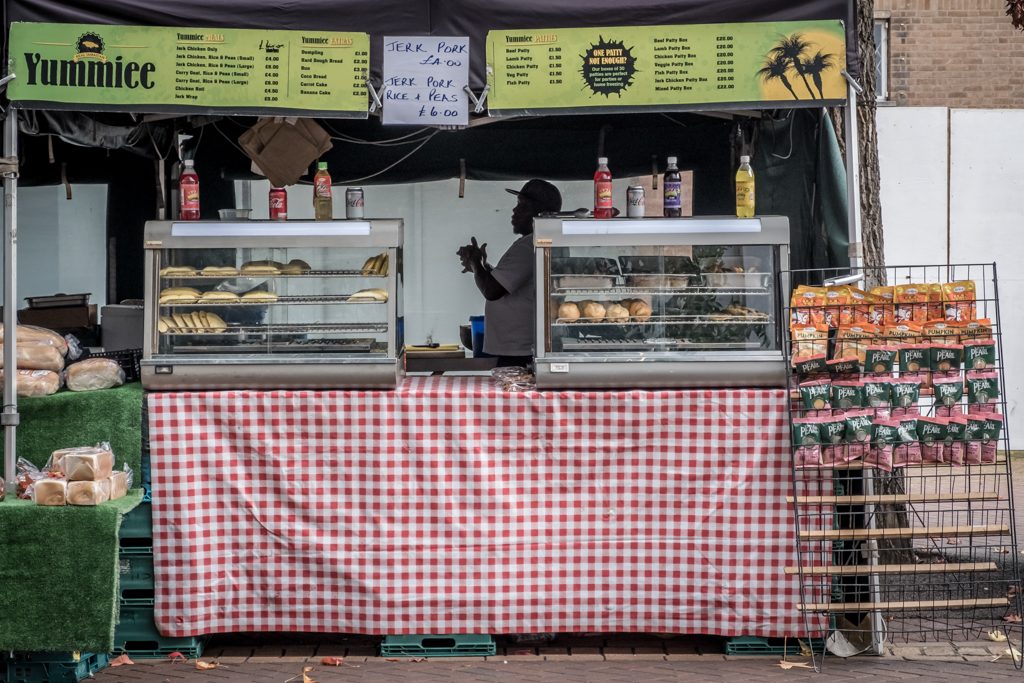
The Meeting / John Gough / Sony a6300

I recently purchased a Sony a6300 because it seems ideal for street photography. I have been setting it up and changing settings for a few weeks, but it is now good to go. The picture above was one of the first using the a6300 setup as described. From what I can see the a6300 settings are similar settings to the Sony a6500.

These notes are also going to be used as my checklist. So often I change a setting for a different circumstance, but do not remember to revert back to my original setup.

The Sony a6300 and Sony a6500 Setup

Cameras are now so configurable that it is worth sitting down for an afternoon to turn your camera into the one you want. Then go out and take a few shots, and change again until it is right. Lets start at the top.

Sony a6300 Aperture

Aperture Priority

The big dial on the top plate of the camera is the mode dial, where Program, Aperture Priority, Shutter Priority, Manual or one of the Auto or Scene modes can be set. Many street photographers recommend Program mode, which is essentially an automatic setting for RAW files. However in Program mode, the Sony algorithm seems to move the shutter speed lower without moving the ISO higher, so I shoot Aperture Priority. It gives control over the aperture using the dial on the right hand side of the camera. This is a function dial, which when in Aperture Priority mode changes the aperture. Now to fix the ISO, and the camera will do the rest.
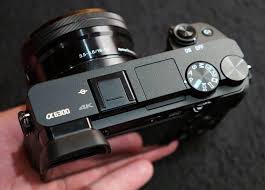
Sony a6300

Sony a6300 top

ISO

Whether you are on the New York streets or taking a picture of your family in the park, you want sharp pictures. As the light fails, move the aperture down to the widest for the lens you have attached. On the kit lens supplied with the Sony a6300 that is f3.5. It is surprising especially in a UK winter, how quickly that buffer is reached. It is also tempting to let the shutter speed get lower, when after all, the lens has image stabilisation. But more of my picture are blurred through a low shutter speed and consequently camera shake than any other reason. So a high ISO is required to give some flexibility.

Reading the reviews, high ISO’s are possible with this camera without compromising image quality. It is personal, high ISO’s lead to more noise. How much is acceptable is up to you. Try it out. Is a high ISO better than a shaky shot. Again it is personal preference.

I usually shoot at ISO640

The quick route to changing ISO is to use the Fn or Function button on the rear of the camera, which brings up some often used controls

Fn>ISO or Menu>Camera>4>ISO or Control Wheel>right.
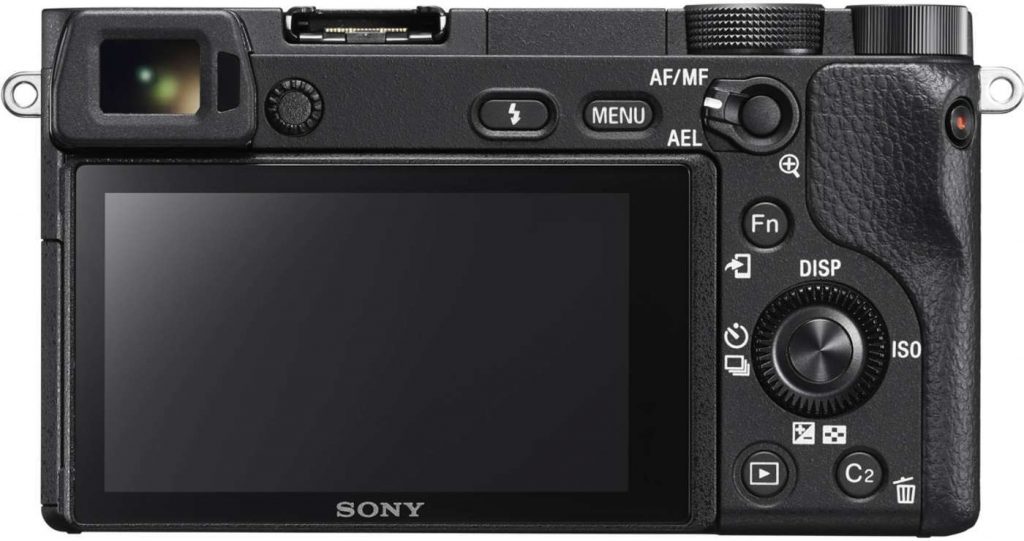
Sony a6300 Back

Sony a6300 Back

Sony a6300 Drive

Drive Mode

I usually leave the drive mode as single shot. The continuous shooting is so fast that before you know it you have hundreds of images to post process.

Fn>Drive>Single Shot or Menu>Camera>2>Drive Mode>Single Shot or Control Wheel>left>Single Shot

Set the C1 Custom Button to Drive Mode

There are circumstances where the continuous mode is useful. I therefore set the Custom 1 button on the top of the camera, to bring up the drive mode menu.

Menu>Wheel>7>Custom Key(Shoot)>Custom Button 1>Drive Mode 

Silent Shutter

This is a completely silent shutter, definitely useful in situations where you don’t want to cause a stir.

Menu>Wheel>5>Silent Shooting On

Personally I prefer to risk the shutter sound. I can be sure then that I have the picture.

Sony A6300 Metering

Metering Mode

Metering technology is pretty much taken for granted, but when you realise how much time used to be spent with light meters, it is really special. Choose a metering mode. The multi mode seems to work the majority of the time

Fn>Metering Mode or Menu>Camera>5>Metering Mode

White Balance

White balance is used to get colours as true as possible. Auto seems to work well. In the rare circumstance that the camera does not handle it correctly, it can be fixed in post processing.

Fn>AWB or Menu>Camera>5>White Balance>Auto

Sony A6300 Focus

Focus Area

There are various options:

Wide

Focuses automatically on a subject in all ranges of the image. When you press the shutter button halfway down in still image shooting mode, a green frame is displayed around the area that is in focus.

Zone

Select a zone on the monitor on which to focus. A zone consists of nine focus areas, and the camera selects a focus area on which to focus.

Centre

Focuses automatically on a subject in the middle of the image. If you half press the shutter or use AF lock it is possible to hold the focus and recompose the shot.

Flexible Spot

This allows you to move the focus frame to where it is required on the shot.

Expand Flexible Spot

If the camera cannot find focus within the focus frame it will focus on points around the flexible spot as a secondary priority area for focusing.

It is worth understanding how mirrorless cameras differ from DSLRs in terms of focusing, and how the Sony a6000’s hybrid focus detection works.

My choice is the flexible spot focus area. It is also possible to select how big the focus area should be. Small, Medium or Large. I recommend running some test shots and see which is best for you. Following my testing I chose the large focus area. It seemed to me that the camera was struggling to find focus when set to Small

Fn>Focus Area>Flexible Spot>Large or Menu>Camera>3>Focus Area>Flexible Spot>Large

Focus Mode: AF-S

Focus Mode (not to be confused with Focus Area) changes how the focus adapts to different scenarios. In AF-C, which is ideal for continuous shooting the camera will reattempt to focus every time a subject moves. AF-S locks the focus despite the subject’s movement. Ideal for single shot shooting.

Fn>AF-s or Menu>Camera>3>Focus Mode>Single Shot AF

AF Illuminator

This is a beam of light which assists the camera focus in low light. However this camera copes admirably in difficult lighting, therefore is is best to switch off and avoid being given away by a red beam of light. Especially useful when covertly shooting on the street.

Menu>Camera>3>AF Illuminator>Off

Pre AF

When Pre-AF is on the camera will continuously focus, even without half-pressing the shutter button. This can be draining to the battery, so I set to off.

Menu>Wheel>3>Pre AF>Off

Priority Set in AF-S

This setting allows the release of the shutter even when the subject is not in focus, when Focus Mode is set to Single-shot AF. There is a setting, AF which prioritises focusing. The shutter will not be released until the subject is in focus. I only want to take pictures that are focused correctly, so that is the setting I use.

Menu>Wheel>5>Priority Set in AF-S>AF

AF with Shutter

Selects whether to focus automatically when you press the shutter button halfway down. Leave this switched on to focus.

Menu>Wheel>5>AF w/shutter>On

AEL with Shutter

Determines whether the exposure and focus are both set when the shutter is pressed half way down. Leave on Auto

Menu>Wheel>5>AEL w/shutter>Auto

Centre Lock-On AF

This feature will track the subject at the centre of the image and is useful in e.g. sports photography. For single shot I switch off.

Menu>Camera>6>Centre Lock-On AF>Off

Smile / Face Detect

This is a clever feature on the Sony a6300, because there is a setting to register faces. This for example could be used at a wedding, to register the bride and grooms’ face. These will then be held in memory and automatically brought into focus in a any scene. Up to eight people can be registered. However I just want to switch on face detect, which is both useful in general photography and street photography.

Menu>Camera>6>Smile / Face Detect>On

Eye Detect

Eye detect is another powerful feature on the Sony a6300. I have it setup so that the AEL button activates eye detect. NB the AEL button must be held down to maintain focus on the eyes.

Menu>Wheel>7>Custom Key Shoot>2>AEL Button>EyeAF

Summary AF

This guide from Sony provides a comprehensive review of the AF function on the Sony a6000, which also applies to the Sony a6300 and 6500.

Sony a6300 Screen and Viewfinder Settings

EVF / Screen

I have this set to auto, so that when you put your eye to the viewfinder, the screen switches off. The problem is that the detector on the view finder is very sensitive, so that when you hold the camera at waist level to use the flip out screen, the screen switches off. There is a custom setting to toggle between finder and screen, but in my experience it does not work consistently. Therefore I use this setting.

Menu>Wheel>4>FINDER / MONITOR>Auto

The solution I have come up to desensitise the finder detector, involves glue and sticking plaster, using a product called Light Dims. These are little inexpensive, stick-on pieces of a neutral grey shading material  which are actually made for putting over LED’s that are too bright.

Simply cut a 3mm x 5mm piece of this material and apply it over the left half of the EVF sensor. The sensor continues to function perfectly, and the LCD remains on even in very low light. The EVF then still switches on again automatically, when the camera is held up to your eye.

Sony a6300 Other Settings

 RAW

I will be shooting RAW. This is set:

Menu>Camera>1>Quality / RAW

Grid Line

Useful tool for composition:

Menu>Wheel>1>Grid Line>Rule of 3rds Grid

MR Setting

To save these settings to 1 on the mode dial on the top plate of the camera

Menu>Camera>9>Memory> 1

Summary Setting Up the Sony a6300

The Sony a6300 is an amazingly versatile camera. The settings may be bewildering, if that is the case then set the camera to Auto and get great results. But to get even better results dive in and understand the settings and make the camera your own.

Right now the Sony a6000 is the best camera without doubt for under £500. The a6700 will likely be launched early 2018, so get in while you can, and please use my link as I receive a small affiliate payment. Many Thanks


Where to Buy Your Equipment

I buy my equipment from Wex because of their exceptional customer service. I once returned a camera after 30 days, and the next day they called to return my money to my account. Their prices are always competitive and they offer good prices on the trade in of your used gear


Filed Under: Journey, Sony, Sony a6300 Tagged With: Sony Cameras

Lee Miller

by John Gough

She was a surrealist and Man Ray’s lover, a super model before the term was invented, a fashion photographer and an acclaimed war photographer.

Yesterday, I listened to a talk about the life of Lee Miller, by her son Antony Penrose. He is now responsible for the Lee Miller Archive.  A conservation project that preserves and displays the 60,000 images that were left behind, when Lee Miller died of cancer in 1977.

Lee Miller War Photographer

At the beginning of WW2 Lee Miller was living in Hampstead, with British surrealist painter and curator Roland Penrose. Her war photography started by recording the Blitz, and working for Vogue, documenting women at work in factories and munitions. In 1942, Miller became an official uniformed US war correspondent. She was one of only four ­accredited female US war ­photographers, following the US Army through the D-Day landings, the liberation of Paris, and the drive into Germany.

In Germany, Miller headed for the Buchenwald and Dachau concentration camps to record the depravity of the Third Reich. She told British Vogue Editor Audrey Withers: “I don’t normally take pictures of horrors. But I hope Vogue will find that it can publish these pictures.”

Hitler’s Bath Tub

After leaving Dachau, Miller and fellow photographer David E Scherman found themselves billeted in the Fuhrer’s apartment in Munich. It was there that she created one of her most iconic photographs, (see my board).  The image is of Lee Miller sitting in Hitler’s bath tub. The dirt from her boots has been wiped on Hitler’s bath mat. Hitler’s photograph is to the left, and on the right are Eva Braun’s ornaments. Even the shower hose straddles her neck like a noose. This picture reveals not only her creativity, but also her audacious defiance.

A Woman’s War

This is Kate Adie talking about a major exhibition of her work at the Imperial War Museum in 2015.

Additional Note

Next year Kate Winslet is to play Lee Miller in a film biopic. The film goes into production in 2018 and is based on the autobiography The Lives of Lee Miller written by Antony Penrose.


Filed Under: Photographer Tagged With: photographers

Street Photography Update

by John Gough

Street Photography

Jerk Pork / John Gough / Canon EOS 6D


What is happening in the world of street photography?

I found a film on Amazon Prime called Everybody Street, which has street photographers from New York, including Bruce Davidson, Mary Ellen Mark, Elliott Erwitt, Ricky Powell and Joel Mayerowitz, talking about how and why they take pictures.

Everybody Street

I have since sourced the film on YouTube:

As I watched the film I jotted down some insights from these iconic photographers:

Why do some photographers go to the street and others go to the studio?

Learning to read your culture is a great fascination for photographers

Capture what might be of interest in the future. When its gone, you realise that you missed taking a picture of it

There are too many bad photographs, but the good ones illuminate and entertain and get some sort of emotion, laugh or cry or something in between

Invisibility, a little camera makes you look like a sneak

Definition of public and private is smashed, so objecting to having a camera in your face is obsolete

You make the picture in the moment, turn left you have a picture, turn right and you don’t get one

Rendering the human condition, sharing the world as it is, recording life my way

More and more I want to take pictures, because I have less and less time left

Photography is about description, that is what a camera does. However as human beings we learn to understand minute little exchanges. It is down to us believing that this slice of a moment will present its self. There are a lot of people that don’t believe that the world is going to present itself in that way, so they don’t see it because they don’t look for it.

If you have a spare hour and a half and you love street photography you will love this film.


I recently saw Damien Demolder talk about street photography

Damien Demolder

Damien is an interesting speaker. He was editor of Amateur Photographer for around fifteen years. He is now a journalist, photographer, reviewer of kit and a judge on some big photography competitions. I recently saw him speak about his photography. Street photography he defines as people and architecture. His work is here

This was just some of the learning I took away.

Photography and especially street photography is showing ordinary things in an extraordinary way.

Light is important. Our subject is light. Wait for light.

Photographers are more observant than other people. Look for that decisive moment.

Shoot with a standard lens. Need to be involved with the subject not standing far away

Holding a viewfinder to your head cuts you off from the world. 98% of pictures are taken from head height. If you have a flip up the screen then shoot from the hip. It is a different view and you can see the picture coming next.

Hold your camera in front of you. Use the screen. You look like an idiot but not like a photographer.

Here is Damien talking about street portraiture:


Filed Under: Journey, Photographer, Photography, Street Photography Tagged With: street photography

Winners of the 2017 Epson International Pano Awards

by everywhereman

Thank you to my friend Cliff Harvey for finding these magnificent pictures, from the 2017 Epson International Pano Awards.


2017 Winners Gallery

Not a competition I was aware of but the images are stunning, especially The Exit. by Ivan Turukhano. Here is some more of his work.


Filed Under: Competitions, Photographer, Photography Tagged With: Photography competitions

Changing the World

by everywhereman

Giles Duley

I was moved by this short video from Wex about Giles Duley a fashion photographer for ten years, who turned to documentary photography.

In 2011, embedded with a military unit in Afghanistan, he stepped on a landmine. The explosion tore through him, costing him three of his limbs — only his right arm remains. After a lengthy recovery he now travels the world, taking pictures of people affected by war and documenting their daily lives


This is a talk Giles did for TED, it gives some background and explains his motivation to become the documentary photographer that became the award winning humanitarian photographer he is today.


When he was flown back from Afghanistan he was not expected to live, but in hospital in Birmingham, his sister remembers him mouthing “I am still a photographer”.

Filed Under: Photographer, Photography

Silver Efex Moody Monochrome

by John Gough


silver efex

Coffee at The Mitre / John Gough / Sony a6300

I was out and about in Cambridge yesterday with my camera, and I was accosted by an elderly lady. She thought that because I was carrying a camera, I must be a snoop from the council. That is just one of the hazards of street photography. Had I been carrying a big DSLR, she would have assumed I was a proper photographer. However, a small camera like the Sony a6300 can unfortunately make you seem like a furtive fellow.

The picture above was taken there. The couple look delighted to have been caught on camera. I was having a good day!

The Google Nik Collection including Silver Efex Pro2

I created the moody monochrome image using Silver Efex Pro2, from the Google Nik Collection.

The Google Nik Collection is the best free resource for photographers available on the web. In 2016 when Google decided not to support the software further, it went on to provide the software free to photographers. This was both good and bad news. The software was free, but it was never going to to be updated. However, a month or so ago it was agreed that DxO acquire the Nik Collection, and fortunately they plan to continue to develop it. A revised version will be available mid 2018.

It is still possible to download the existing software, including Silver Efex for monochrome post processing here.

Silver Efex Pro2

This is a note to myself about how the image was processed.

Lightroom

In Lightroom, there are the usual workflow: exposure, sharpness and white balance adjustments to process from RAW. The image was then desaturated to -31, the vibrance taken down to -29 and the clarity pushed up to +71. Reducing the colour to provide a dark and moody presence.  I also added a shallow tone curve and imperceptible vignette.

Photoshop

Removed the reflection of myself and used the burn tool to tone down the interior of the pub, reducing lights and reflections.

Silver Efex

Processed to mono using preset 23 Wet Rocks and film type Agfa APX Pro 100.

Conclusion

To achieve that look, without Silver Efex would be impossible for an amateur retoucher like myself. Furthermore, in the distant analogue days it would have taken hours of work in the darkroom to achieve the same results.


Learn more:


Filed Under: Journey, Lightroom, Nik Collection, Photography, Photoshop, Post Processing, Silver Efex, Sony a6300, Street Photography Tagged With: Post Processing

How to Make Your Photos Pop

by John Gough

I recently entered an event at Bedford Camera Club, where we were presented with six photographs in RAW. Our objective was to process three images and present back how we did it. These are my notes, about how I went about trying to make these photos pop in Lightroom and Photoshop. I have not explained the technical details, but I have included some links to all the technical information..

Amazon have a good deal on Lightroom and Photoshop at the moment:


Image 1. How to make Your Photos Pop

This is the first image in RAW. Looks very drab and ordinary, BEFORE processing.

How to make your Photos pop

Image 1 BEFORE

The Issues with this Image

The picture is grey and washed out. There is no detail in the sky. There is no real focus on what the subject is. There is too much foreground. The edges are messy. The detail in the pebbles and brickwork are lost.

Processing in Lightroom and Photoshop

  1. Import the RAW file to Lightroom CC.
  2. Crop to A4 (Custom size 2.1 x 2.97) tightening the view to concentrate on the fishing boats. Excluding the motor boat on the right.
  3. Straighten the horizon. The roof in the background is not flat
  4. Check exposure. This image looks around a third of a stop under exposed
  5. Add contrast to make the image less flat
  6. Launch a Develop Lightroom preset. Here we are using my user preset for landscape
    1. Highlights -100 Shadows +100
    2. Adjust the whites and blacks by holding down the alt key (Windows)
    3. Move the Clarity / Vibrance / Saturation sliders to suit the effect required.
    4. Tone Curve.  Again to suit effect. Try an S curve
    5. Sharpening and Luminance around 30-45
    6. Tick Lens Correction and Enable Profile Correction
  7. Check the white balance. Take the dropper and pick a neutral grey colour. This will set the white balance.
  8. Move the image to Photoshop. Photo>Edit in>Edit in Photoshop CC
  9. Clone out the distracting speed boat on the right.
  10. Use the Dodge Tool to lighten the foreground and under the boats
  11. Use the Burn Tool just to add some detail back into the buildings and the decks of the boat
  12. To replace the sky. Erase the existing sky. Select>Colour Range>Fuzziness c’139. NB this method avoids having to somehow cut around the masts and rigging
  13. Use Erase tool to take out any remaining sky.
  14. Select an image with sky and add as a layer. Blend with the existing layer
  15. In Photoshop save. Image then available in Lightroom
  16. In Lightroom recheck the white balance / exposure /contrast etc for the new merged image
  17. Add a Post Crop Vignette that is there but not visible e.g. -14
  18. Save the image as a JPG
How to make your photos pop

Image 1 AFTER


Image 2 How to make Your Photos Pop

This is the second image in RAW. At least there is some interest in this image, but despite the magnificent architecture, it is drab and unexciting.

how to make a photo pop

Image 2 BEFORE


The Issues with this Image

This image has an odd sepia cast, as if the white balance needs correction. The detail in the sky is probably not worth trying to recover and could be replaced. The picture is dark and lacks detail. There is no real focus on the subject, the photograph is not about the two pigeons in the foreground.

Processing in Lightroom and Photoshop

  1. Import the RAW file into Lightroom CC
  2. Crop to A4 and lose the foreground
  3. Check exposure. This image looks around a third of a stop under exposed
  4. Add contrast to
  5. Launch a Lightroom preset (see above)
    1. Clarity / Vibrance / Saturation important to get some colour from the bland landscape.
    2. Manipulate the tone curve to get some detail
  6. The tower looks as though it is leaning backwards
    1. Go to the Transform tool
    2.  Use the vertical slider to -20 to correct
  7. Move the image to Photoshop. Photo>Edit in>Edit in Photoshop CC
  8. Use dodge and burn tools to create different light in the piazza, and to the buildings left and right
  9. Erase the sky. Select>Colour Range>Fuzziness (see above). This will preserve the building tracery on the buildings to the left and the spires and crosses
  10. Select an image with sky and add as a layer. Blend with the existing layer
  11. In Photoshop save. The image is then available in Lightroom
  12. In Lightroom recheck the white balance / exposure /contrast etc for the new merged image
  13. Add a Post Crop Vignette that is there but not visible
  14. The image still has an orange cast so recheck the white balance. The foreground piazza looks as though it should be grey so use the dropper to sample colour there.
  15. Save the image as a JPG
photos pop

Image 2 AFTER

Image 3 How to Make Your Photos Pop

This is the third image in RAW. There is a picture in there somewhere trying to get out.

photos pop

Image 3 BEFORE

The Issues with this Image

The detail in the columns is lost. There is no real colour so would it be better in black and white? The portrait mode makes the picture mostly pavement. The two nuns should be made the focus of the image.

Processing in Lightroom, Photoshop and Nik Silver Efex Pro2

  1. Import the RAW file into Lightroom CC
  2. Crop to A4 and change from portrait to landscape. That way we focus on the ladies walking and lose the black shadow overhead. Place ladies in the centre of the rule of thirds grid
  3. Check white balance/exposure/contrast
  4. Apply a Lightroom preset (see above)
  5. Move the image to Photoshop. Photo>Edit in>Edit in Photoshop CC
  6. Use dodge tool to reveal the detail in the columns and paving.
  7. In Photoshop save. The image is then available in Lightroom
  8. Move the image to Nik Silver Efex Pro2 which you can download for free here. Photo>Edit in>Edit in Siver Efex Pro2
  9. Select a preset from the preset library in Silver Efex.
  10. Save to move image back to Lightroom
  11. Add a Post Crop Vignette that is there but not visible
  12. Save the image as a JPEG


I am fascinated by digital post production. However, I am still very much in the foothills in the journey to master Photoshop especially. If you want to see just what can be achieved, look at the books and videos of Glyn Dewis.


Filed Under: Journey, Lightroom, Nik Collection, Photography, Photoshop, Post Processing, Silver Efex Tagged With: Post Processing

Fujifilm X-Trans Sensor Problems

by John Gough

I just wanted to add to the debate about the Fujifilm X-Trans sensor which is the APSC sensor used in Fujifilm X series cameras like the XT2, XT20 and XPro2.

The debate which rages on countless forums, centres around the artefacts that can be found on RAW files after they have been processed in Lightroom. Photographers claim that there can be worm like backgrounds and smeary images on high ISO images. Other Fuji users claim never to have come across this problem. Well I did.

Examples of X-Trans Sensor Problems

Here are a couple of examples shown at high magnification taken on a Fuji XT20 at just ISO640.

X-Trans

X-Trans Sensor Worms


X-Trans

X-Trans Smears

Although the sensor is claimed to be 24 MP, and that size of sensor should be able to create up to a c’3′ x 2′ print. I would not like to rely on it if details like these were  evident. Therefore creating fine art prints with this camera is not going to be possible.

The Technicalities: Fuji X-Trans Sensor

To understand the technicalities of why this is. Then refer to this excellent article.

https://petapixel.com/2017/01/27/x-trans-promise-problem/


Conclusion

The answer to the problem many people argue in forums is not to process Fujifim X-Trans images in Lightroom, users suggest instead to use  Capture One. Surely however, there is something seriously wrong when one of the world’s most popular cameras, can not use the world’s most popular processing engine and workflow.


Where to Buy Your Equipment

I buy my equipment from Wex because of their exceptional customer service. I once returned a camera after 30 days, and the next day they called to return my money to my account. Their prices are always competitive and they offer good prices on the trade in of your used gear


Filed Under: Fujifilm, Gear, Lightroom Tagged With: Fuji Cameras

Portraits in Lightroom

by John Gough

A note to myself, this is an excellent tutorial for processing a portrait in Lightroom. Until now I had always assumed that these tools were only available in Photoshop and required masking and layers, but  this portrait is handled from start to finish in Lightroom. Impressive cloning too towards the end. Well done Marc Webster.

Filed Under: Lightroom, Photography, Post Processing Tagged With: Post Processing

RPS International Photography Exhibition

by John Gough

RPS International Exhibition

Shoreditch Street Art / John Gough / Canon EOS 6D

I visited the RPS International Photography Exhibition this week and there were a lot of strong images on display. So strong I wished I had taken many of them. A high level of envy on my part, is  sufficient criteria for a really stunning image.

The RPS International Photography Exhibition has been held almost every year since 1854. Now in its 160th year, it is the longest running exhibition of its kind in the world.

The RPS describes the exhibition as reflecting, ‘the varying interests and vibrant aesthetics of the photographic medium today, presenting work which demonstrates photographic skill and technique, alongside images exploring ideas and narratives rich in meaning and message. It encompasses single images and series work across all genres.  The work is executed in many ways from alternative processes to contemporary approaches’.

The RPS it seems is becoming more and more pompous. A prime candidate for Private Eye / Pseuds Corner.

The Awards

The gold award went to Margaret Mitchell. Her winning entry is here.  Her poignant environmental portraits of her sister’s children and others is part of a larger project, In This Place .

‘In This Place’ raises questions about choice—do we have choices in life, or are some predetermined and made for us?

Margaret took pictures of her nephew and two nieces as children, growing up in Stirling for a previous work called Family. More recently Margaret started photographing them again. Her sister’s children are now adults and have kids of their own. However their living conditions are the same, and it appears that the same outcome awaits each child. It is as if there were, some sort of self fulfilling cycle.

The silver award went to R J Kern. From this it is easy the current popularity of the environmental portrait. A glimpse of his exhibition The Unchosen Ones.

The Walk to the Station

The exhibition was at the Truman Brewery in Shoreditch, which was an excuse to walk the London streets with my camera. The street art is amazing.

Filed Under: Canon Cameras, Competitions, Exhibitions, Photography Tagged With: Photography competitions

« Previous Page
Next Page »

My Latest Notes About Photography

  • Remembering Martin Parr
  • Let them Shoot JPEGS
  • I Am Martin Parr
  • Lightroom Presets Using ChatGPT
  • Experience Saul Leiter

What’s in My Notes

Copyright: John Gough 2025