The Meeting / John Gough / Sony a6300
I recently purchased a Sony a6300 because it seems ideal for street photography. I have been setting it up and changing settings for a few weeks, but it is now good to go. The picture above was one of the first using the a6300 setup as described. From what I can see the a6300 settings are similar settings to the Sony a6500.
These notes are also going to be used as my checklist. So often I change a setting for a different circumstance, but do not remember to revert back to my original setup.
The Sony a6300 and Sony a6500 Setup
Cameras are now so configurable that it is worth sitting down for an afternoon to turn your camera into the one you want. Then go out and take a few shots, and change again until it is right. Lets start at the top.
Sony a6300 Aperture
Aperture Priority
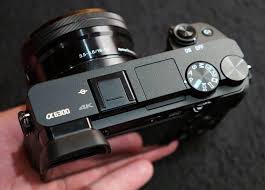
The big dial on the top plate of the camera is the mode dial, where Program, Aperture Priority, Shutter Priority, Manual or one of the Auto or Scene modes can be set. Many street photographers recommend Program mode, which is essentially an automatic setting for RAW files. However in Program mode, the Sony algorithm seems to move the shutter speed lower without moving the ISO higher, so I shoot Aperture Priority. It gives control over the aperture using the dial on the right hand side of the camera. This is a function dial, which when in Aperture Priority mode changes the aperture. Now to fix the ISO, and the camera will do the rest.

Sony a6300 top
ISO
Whether you are on the New York streets or taking a picture of your family in the park, you want sharp pictures. As the light fails, move the aperture down to the widest for the lens you have attached. On the kit lens supplied with the Sony a6300 that is f3.5. It is surprising especially in a UK winter, how quickly that buffer is reached. It is also tempting to let the shutter speed get lower, when after all, the lens has image stabilisation. But more of my picture are blurred through a low shutter speed and consequently camera shake than any other reason. So a high ISO is required to give some flexibility.
Reading the reviews, high ISO’s are possible with this camera without compromising image quality. It is personal, high ISO’s lead to more noise. How much is acceptable is up to you. Try it out. Is a high ISO better than a shaky shot. Again it is personal preference.
I usually shoot at ISO640
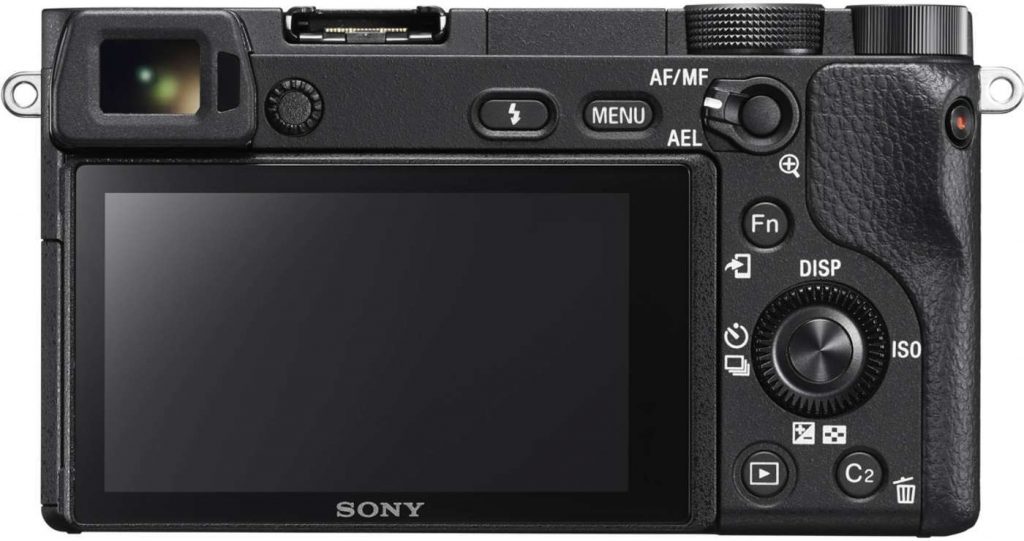
The quick route to changing ISO is to use the Fn or Function button on the rear of the camera, which brings up some often used controls
Fn>ISO or Menu>Camera>4>ISO or Control Wheel>right.

Sony a6300 Back
Sony a6300 Drive
Drive Mode
I usually leave the drive mode as single shot. The continuous shooting is so fast that before you know it you have hundreds of images to post process.
Fn>Drive>Single Shot or Menu>Camera>2>Drive Mode>Single Shot or Control Wheel>left>Single Shot
Set the C1 Custom Button to Drive Mode
There are circumstances where the continuous mode is useful. I therefore set the Custom 1 button on the top of the camera, to bring up the drive mode menu.
Menu>Wheel>7>Custom Key(Shoot)>Custom Button 1>Drive Mode
Silent Shutter
This is a completely silent shutter, definitely useful in situations where you don’t want to cause a stir.
Menu>Wheel>5>Silent Shooting On
Personally I prefer to risk the shutter sound. I can be sure then that I have the picture.
Sony A6300 Metering
Metering Mode
Metering technology is pretty much taken for granted, but when you realise how much time used to be spent with light meters, it is really special. Choose a metering mode. The multi mode seems to work the majority of the time
Fn>Metering Mode or Menu>Camera>5>Metering Mode
White Balance
White balance is used to get colours as true as possible. Auto seems to work well. In the rare circumstance that the camera does not handle it correctly, it can be fixed in post processing.
Fn>AWB or Menu>Camera>5>White Balance>Auto
Sony A6300 Focus
Focus Area
There are various options:
Wide
Focuses automatically on a subject in all ranges of the image. When you press the shutter button halfway down in still image shooting mode, a green frame is displayed around the area that is in focus.
Zone
Select a zone on the monitor on which to focus. A zone consists of nine focus areas, and the camera selects a focus area on which to focus.
Centre
Focuses automatically on a subject in the middle of the image. If you half press the shutter or use AF lock it is possible to hold the focus and recompose the shot.
Flexible Spot
This allows you to move the focus frame to where it is required on the shot.
Expand Flexible Spot
If the camera cannot find focus within the focus frame it will focus on points around the flexible spot as a secondary priority area for focusing.
It is worth understanding how mirrorless cameras differ from DSLRs in terms of focusing, and how the Sony a6000’s hybrid focus detection works.
My choice is the flexible spot focus area. It is also possible to select how big the focus area should be. Small, Medium or Large. I recommend running some test shots and see which is best for you. Following my testing I chose the large focus area. It seemed to me that the camera was struggling to find focus when set to Small
Fn>Focus Area>Flexible Spot>Large or Menu>Camera>3>Focus Area>Flexible Spot>Large
Focus Mode: AF-S
Focus Mode (not to be confused with Focus Area) changes how the focus adapts to different scenarios. In AF-C, which is ideal for continuous shooting the camera will reattempt to focus every time a subject moves. AF-S locks the focus despite the subject’s movement. Ideal for single shot shooting.
Fn>AF-s or Menu>Camera>3>Focus Mode>Single Shot AF
AF Illuminator
This is a beam of light which assists the camera focus in low light. However this camera copes admirably in difficult lighting, therefore is is best to switch off and avoid being given away by a red beam of light. Especially useful when covertly shooting on the street.
Menu>Camera>3>AF Illuminator>Off
Pre AF
When Pre-AF is on the camera will continuously focus, even without half-pressing the shutter button. This can be draining to the battery, so I set to off.
Menu>Wheel>3>Pre AF>Off
Priority Set in AF-S
This setting allows the release of the shutter even when the subject is not in focus, when Focus Mode is set to Single-shot AF. There is a setting, AF which prioritises focusing. The shutter will not be released until the subject is in focus. I only want to take pictures that are focused correctly, so that is the setting I use.
Menu>Wheel>5>Priority Set in AF-S>AF
AF with Shutter
Selects whether to focus automatically when you press the shutter button halfway down. Leave this switched on to focus.
Menu>Wheel>5>AF w/shutter>On
AEL with Shutter
Determines whether the exposure and focus are both set when the shutter is pressed half way down. Leave on Auto
Menu>Wheel>5>AEL w/shutter>Auto
Centre Lock-On AF
This feature will track the subject at the centre of the image and is useful in e.g. sports photography. For single shot I switch off.
Menu>Camera>6>Centre Lock-On AF>Off
Smile / Face Detect
This is a clever feature on the Sony a6300, because there is a setting to register faces. This for example could be used at a wedding, to register the bride and grooms’ face. These will then be held in memory and automatically brought into focus in a any scene. Up to eight people can be registered. However I just want to switch on face detect, which is both useful in general photography and street photography.
Menu>Camera>6>Smile / Face Detect>On
Eye Detect
Eye detect is another powerful feature on the Sony a6300. I have it setup so that the AEL button activates eye detect. NB the AEL button must be held down to maintain focus on the eyes.
Menu>Wheel>7>Custom Key Shoot>2>AEL Button>EyeAF
Summary AF
This guide from Sony provides a comprehensive review of the AF function on the Sony a6000, which also applies to the Sony a6300 and 6500.
Sony a6300 Screen and Viewfinder Settings
EVF / Screen
I have this set to auto, so that when you put your eye to the viewfinder, the screen switches off. The problem is that the detector on the view finder is very sensitive, so that when you hold the camera at waist level to use the flip out screen, the screen switches off. There is a custom setting to toggle between finder and screen, but in my experience it does not work consistently. Therefore I use this setting.
Menu>Wheel>4>FINDER / MONITOR>Auto
The solution I have come up to desensitise the finder detector, involves glue and sticking plaster, using a product called Light Dims. These are little inexpensive, stick-on pieces of a neutral grey shading material which are actually made for putting over LED’s that are too bright.
Simply cut a 3mm x 5mm piece of this material and apply it over the left half of the EVF sensor. The sensor continues to function perfectly, and the LCD remains on even in very low light. The EVF then still switches on again automatically, when the camera is held up to your eye.
Sony a6300 Other Settings
RAW
I will be shooting RAW. This is set:
Menu>Camera>1>Quality / RAW
Grid Line
Useful tool for composition:
Menu>Wheel>1>Grid Line>Rule of 3rds Grid
MR Setting
To save these settings to 1 on the mode dial on the top plate of the camera
Menu>Camera>9>Memory> 1
Summary Setting Up the Sony a6300
The Sony a6300 is an amazingly versatile camera. The settings may be bewildering, if that is the case then set the camera to Auto and get great results. But to get even better results dive in and understand the settings and make the camera your own.
Right now the Sony a6000 is the best camera without doubt for under £500. The a6700 will likely be launched early 2018, so get in while you can, and please use my link as I receive a small affiliate payment. Many Thanks
Where to Buy Your Equipment
I buy my equipment from Wex because of their exceptional customer service. I once returned a camera after 30 days, and the next day they called to return my money to my account. Their prices are always competitive and they offer good prices on the trade in of your used gear